2. Administration System
In Administration > System, you can record setup data related to the application’s overall functionality and performance. This data affects;
- The mechanics of the system
- The processes of the system
- The search for Location of files to complete the tasks.
Navigating to Administration System
- On the Oracle Financial Services Lending and Leasing home screen, click Setup > Setup > Administration > System
The System drop-down link records the following data:
- System Parameters
- Lookups
- User Defined Tables
- Audit Tables
- Transaction Codes
- Data Files
- Events
- Batch Jobs
- Reports
- Error Messages
- Translations
- Seed Data
Using these parameters, you can control the behavior of the system from a technical perspective. For example, determine parameter values, define what information is audited, and record default values. The product provides default values for all these screens.
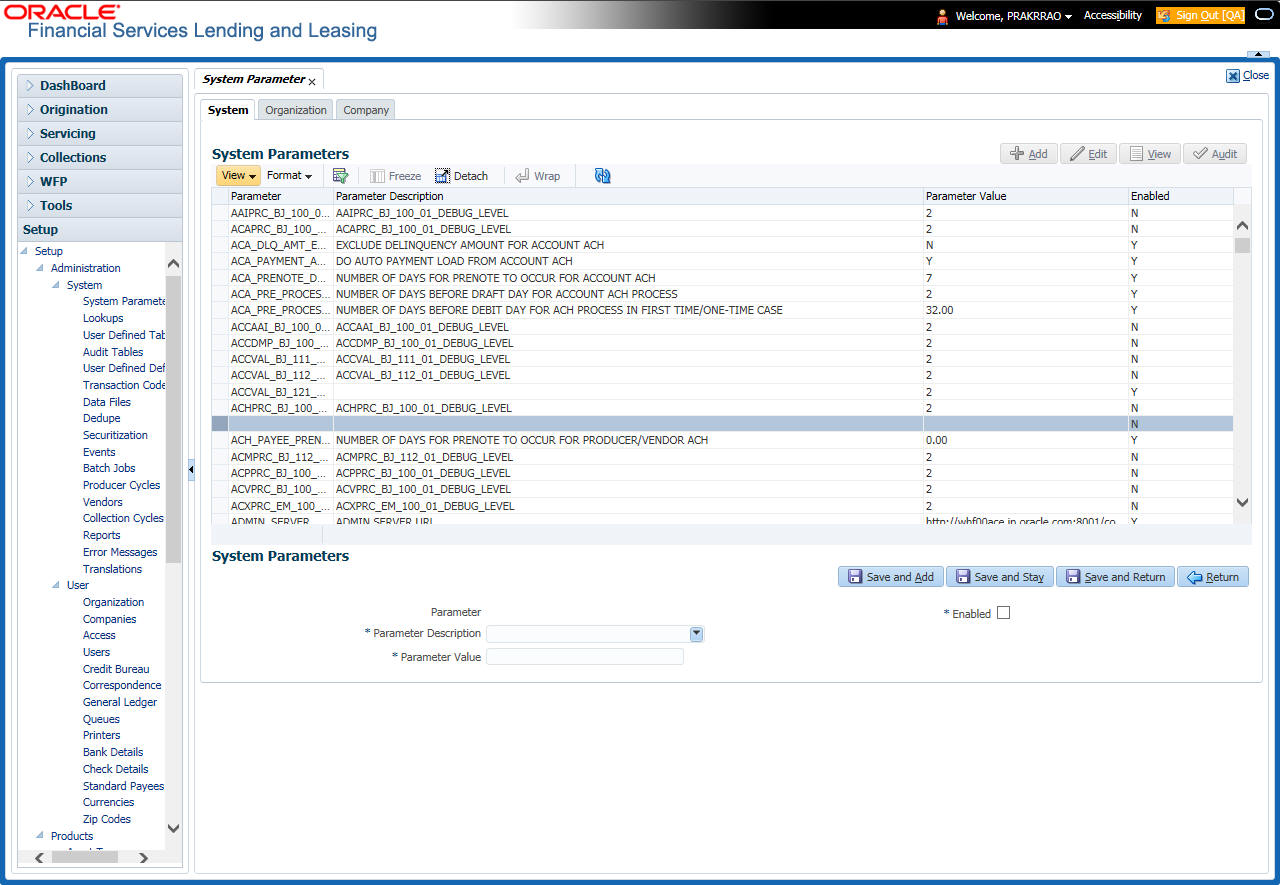
2.1 System Parameters
System parameters define information or values used throughout the system. They act as switches that control the manner in which a function is implemented, or whether or not the system performs a particular task. Parameters are used throughout the system to control everything from user access to what information is stored on any given form. Parameters also define configuration data, such as the location of the system files, the URLs for the report and image servers, and other administration controlled data. Some of the system parameters are setup when the system is installed, but the values associated with the parameters need to be reviewed and maintained.
There are three types of parameters in the system, grouped by what part of the system they affect:
Parameter Type: |
Parameter Range: |
System parameters |
These parameters apply to the entire system. Examples: batch processes, archiving, aging. |
Organization parameters |
These parameters apply to the organization, division, and user responsibility. Examples: User login control, password expiration. |
Company parameters |
These parameters apply to the company and branch. Examples: decision fax control, scoring model. |
Hence, the System Parameters screen contains the following three tabs:
- System Parameters
- Organization Parameters
- Company Parameters
2.1.1 System Parameters Setup
The System Parameters Setup screen displays and records each system wide parameter, along with its current value and whether or not it is enabled. These parameters relate to the overall processing of the system, such as application server file locations and data purging configuration.
Note
You can only define these parameters. Changing the values of any of these parameters affects the related processing.
To set up the System Parameters
- Click Setup > Setup > Administration > System > System Parameters > System. The system displays the System Parameter screen
- In the System Parameters section, perform any of the Basic Operations mentioned in Navigation chapter.
A brief description of the fields is given below:
Field |
Do this |
Parameter |
System parameter of the specified parameter description is displayed here. |
Parameter Description |
Select the description of system parameter from the drop-down list. |
Parameter Value |
Specify the value for the system parameter (required). |
Enabled |
Check this box to enable the parameter. |
- Perform any of the Basic Actions mentioned in Navigation chapter.
For a detailed list of available parameters, refer to Appendix “System Parameters” chapter.
2.1.1.1 FCUBS Integration
Oracle Financial Services Lending and Leasing (OFSLL) is integrated with Oracle FLEXCUBE Universal Banking System (FCUBS) with the capability to integrate the centralized CIF (Customer Information Files), ELCM (Enterprise Limits and Collateral Management) and CASA (Current Account and Savings Account) modules.
To work with the integrated environment functionalities, you need to enable the following core banking indicator.
Parameter |
Parameter Description |
CMN_CORE_BANK |
CORE BANKING INTERFACE INDICATOR |
Note
Re-qualification is pending for Core and Direct Banking Integration.
For detailed information about integration changes, you can refer to ‘FCUBS Integration Documents’ section at OTN library (http://docs.oracle.com/cd/E59770_01/homepage.htm).
2.1.2 Organization Parameters
The Organization parameters control the system functions related to user log in, such as passwords and expiration dates, responsibility levels and the ability to access the system features. Individual parameters can be created with different values for uniquely defined organizations, divisions, and responsibility combinations.
When determining which parameter to use, the system selects the best match based on a hierarchical sort by the Organization, Division, and Responsibility fields, with values of ALL being a lower order match than an exact match.
For example:
Assume the organization parameter UIX_APP_VIEW_ALL_APPS (VIEW ALL APPLICATIONS) is as follows:
- If a user belongs to an organization as ‘DMC’ with a responsibility of SUPERUSER and is using the Underwriting screen of Lending menu, the system will return with a value N, and the system will not allow the user to view all applications.
- If the user belongs to any organization with a responsibility of SUPERUSER, and is using the Underwriting screen of Lending menu, the system will return with a value Y, and the system will allow the user to view all applications.
Note
Be aware that while the system allows for Organization parameters to be defined at all three hierarchical (organization, division, and responsibility) levels, not all will be applicable to each parameter. For example, while you can define the UIX_SMTP_SERVER (Email server for user) for a responsibility, you would normally want only to define this parameter based on organization or division.
To set up the Organization Parameters
- Click Setup > Setup > Administration > System > System Parameters > Organization tab.
- In the Organization Parameters section, perform any of the Basic Operations mentioned in Navigation chapter.

A brief description of the fields is given below:
Field |
Do this: |
Parameter |
Parameter of the specified parameter description is displayed here. |
Parameter Description |
Select the description of system parameter from the drop-down list. |
Parameter Value |
Specify the value for the system parameter. |
Organization |
Select the organization for which the parameter will be valid from the drop-down list. |
Division |
Select the department for which the parameter will be valid from the drop-down list. |
Responsibility |
Select the responsibility for which the parameter will be valid from the drop-down list. IMPORTANT: In selecting which organization parameter to use, the system searches for a best match using the following attributes: 1. Organization 2. Division 3. Responsibility Hence, Oracle Financial Services Software recommends creating a version of each organization parameter, where ALL is these fields. |
Enabled |
Check this box to enable the parameter. |
- Perform any of the Basic Actions mentioned in Navigation chapter.
For a detailed list of available parameters, refer to Appendix “System Parameters” chapter.
2.1.3 Company Parameters
The Company parameters control the system processes associated with functions that may vary for different companies or branches. These parameters address credit scoring, credit bureau interfaces, fax services, and fax generation. Individual parameters may be set up with different values for uniquely defined company and branch combinations.
When these parameters values are requested by the system, the system responds with the “best” match based on a hierarchical sort ordered on company and branch fields, with values of ALL being a lower order match than an exact match. For example, assume the company parameter UIX_RUN_AAI_ACT (online account creation and activation) has been defined as:
The system uses these two parameters to determine whether to create and activate an account online.
- When processing items for the company US01, the system will return a value N and not create and activate an account online.
- When processing items for the company other than US01 and within the value All, the system will return with a value Y and create and activate an account online.
To set up the Company Parameters
- Click Setup > Setup > Administration > System > System Parameters > Company tab.
- On the Company Parameters screen, perform any of the Basic Operations mentioned in Navigation chapter.
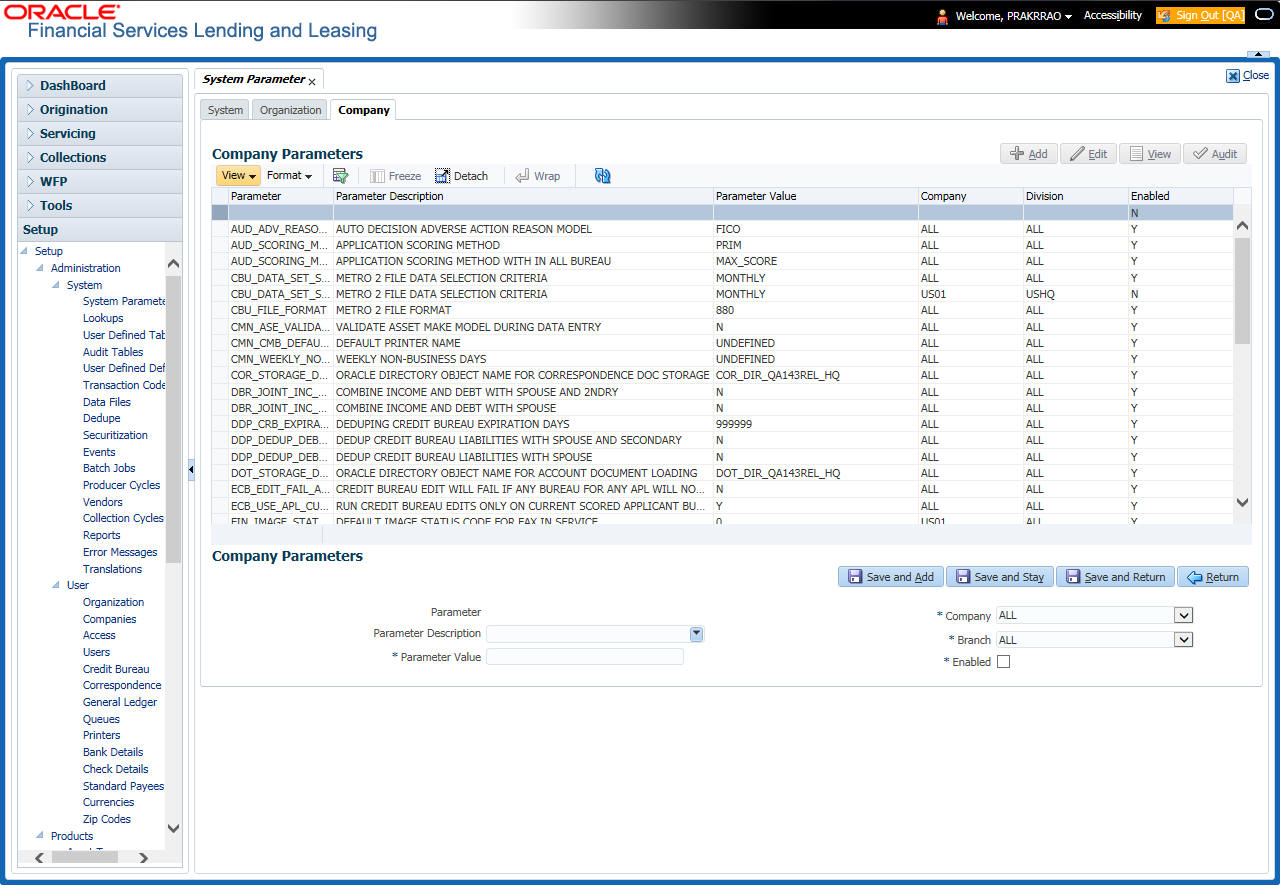
A brief description of the fields is given below:
Field |
Do this: |
Parameter |
The system displays the parameter, when you select parameter description. |
Parameter Description |
Select the description of system parameter from the drop-down list. |
Parameter Value |
Specify the value for the system parameter. |
Company |
Select the portfolio company for which the parameter will be valid from drop-down list. |
Branch |
Select the portfolio branch for which the parameter will be valid from the drop-down list (required). IMPORTANT: In selecting which company parameter to use, the system searches for a best match using the following attributes: 1. Company 2. Branch For this reason, the Software recommends creating a version of each company parameter where ALL is the value in these fields. |
Enabled |
Check this box to enable the parameter. |
- Perform any of the Basic Actions mentioned in Navigation chapter.
For a detailed list of available parameters, refer to Appendix “System Parameters” chapter.
2.2 Lookups Setup screen
The Lookup Setups screen defines the contents in many drop-down fields used throughout the system. Fields that make use of drop-down field will accept only entries that are stored on this screen.
The Lookups screen contains two sections: Lookup Types and Lookup Codes. Lookup types and codes can be system-defined or user-defined. The lookup types describe the function of the related lookup codes.
For system-defined lookup types, only the Description field may be changed.
A system-defined lookup type (Lookup Types block, System Defined is selected) is one that is critical to the system and cannot be changed. However, you can still modify the lookup type description and Record indicator (Enabled/Disabled).
A user-defined lookup type (Lookup Types block, System Defined is not selected) is one that can be modified, depending on a user's business needs. You can modify the description, system indicator and record indicator. If a lookup type is user-defined, the lookup code belonging to that lookup type can either be system-defined or user-defined.
A system-defined lookup code (Lookups screen, System Defined is selected) is one on which the system processing is dependent. Without this lookup code, the process produces incorrect results or fails.
A user-defined lookup code (Lookups screen, System Defined is not selected) is one that can be defined or altered by a user.
WARNING: System-defined lookup types are those that are required by the system. Their related lookup codes will also be system defined. If you update and save a user-defined lookup type as a system-defined-lookup type (that is, change the System Defined button from No to Yes in the Lookup Type sub screen), the system will not allow you to change the lookup type back to user-defined in the future.
Note
Lookup codes cannot be deleted, as they may have been used in the past, and the display and processing of that data is still dependent on the existing setup.
Typically, the system Administrator would modify the descriptions of lookup codes and add new lookup codes to the existing lookup types as needed.
To set up the Lookups
- Click Setup > Setup > Administration > System > Lookups. The system displays the Lookups screen. The details are grouped into two:
- Lookup Types
- Lookup Codes
- In the Lookup Types section, perform any of the Basic Operations mentioned in Navigation chapter.

A brief description of the fields is given below:
Field |
Do this: |
Lookup Type |
Specify the lookup type. |
Description |
Specify the description for the lookup type . |
System Defined Yes/No |
Select ‘Yes’, if you wish to maintain the lookup type as system defined and ‘No’, if you wish to maintain lookup type as User defined. |
Enabled |
Check this box to enable the lookup type. |
- Perform any of the Basic Actions mentioned in Navigation chapter.
- In the Lookup Codes section, you can setup individual codes that a field or process using the related lookup type can have. Perform any of the Basic Operations mentioned in Navigation chapter.
A brief description of the fields is given below:
Field |
Do this: |
Lookup Code |
Specify the lookup code. These are solely dependent on the function of the Lookup Type. |
Description |
Specify the lookup code description. This may be changed as per your business requirement. |
Sort |
Specify the sort order for the lookup code. This determines the order these lookup codes are displayed or processed. |
Sub Code |
Specify the sub code for the lookup code. |
System Defined Yes/No |
Select ‘Yes’, if you wish to maintain the lookup code as system defined and ‘No’, if you do not want to maintain it as system defined. System defined lookup codes cannot be modified, except for changing the Description or Sorting fields. If the lookup type is not system defined, then the code can be modified. |
Enabled |
Check this box to enable the lookup code. |
- Perform any of the Basic Actions mentioned in Navigation chapter.
2.3 User Defined Tables
In User Defined Tables you can maintain user-defined tables, such as the data attributes the system uses on its Search screens.
In the following example, the list of attributes in the Criteria column are computed from the User Defined Tables screen.
To set up a user-defined table, you must:
- Define the fields on the table.
- Join the related tables.
- Assign the table a lookup type.
You can create tables for different products, funding, and collateral types.
After creating the user-defined tables, the system sorts the attributes to make the system usage more efficient. These details are used with different functions of the system, including:
- Tracking follow-up items
- Creating details in bankruptcy, foreclosure/repossession, and deficiency
Note
Many of these tables, (Asset Tracking Attributes for example) may be configured during the initial setup of the application to provide for your specific business needs. Others, such as Application Search, may be changed whenever your business needs change. Still others should not be changed without consulting Oracle Financial Services Software, as changing them would require changes to existing code for the expected results to be implemented. As a thumb rule, it is better to add or disable information on the User Defined Tables screen than to edit existing entries.
To set up the User Defined Tables
- Click Setup > Setup > Administration > System > User Defined Tables. The system displays the User Defined Tables screen. The details are grouped into two:
- User Defined Tables
- User Defined Table Attributes
- In the User Defined Tables section, perform any of the Basic Operations mentioned in Navigation chapter.
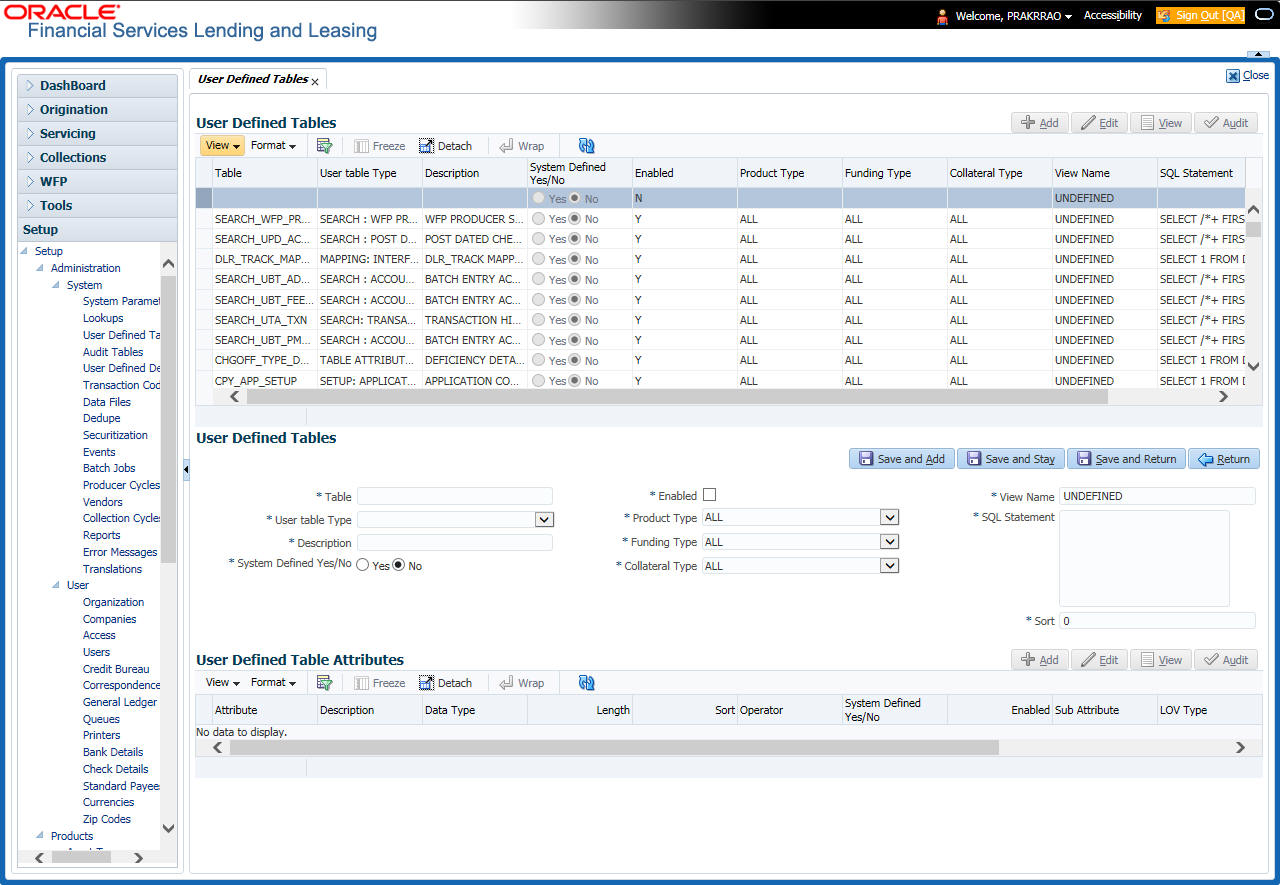
A brief description of the fields is given below:
Field |
Do this: |
Table |
Specify the user-defined table name. |
User Table Type |
Select the user-defined table type from the drop-down list. This determines where and how the related data is being used. |
Description |
Specify the description for user-defined table. |
System Defined Yes/NO |
Select ‘Yes’, if you wish to maintain the User table type as system defined and ‘No’, if you do not want to maintain it as system defined. System defined entries cannot be modified. If the entry is not system defined, then it can be modified. |
Enabled |
Check this box to enable the user-defined table (optional). |
Product Type |
Select the product typefrom the drop-down list. |
Funding Type |
Select the funding type associated with the user-defined table from the drop-down list. |
Collateral Type |
Select the collateral type associated with the user-defined table from the drop-down list. |
View Name |
Specify the view name. |
SQL Statement |
Specify the SQL version of the statement. For Example: For SEARCH_ACC_ACCOUNTS table, the SQL is as follows: SELECT /*+ FIRST_ROWS */ ACC_AAD_ID FROM ACCOUNTS WHERE Note: For the above SQL, the where criteria is part of the User Defined Table Attributes |
Sort |
Specify the sort order for the user-defined table relative to other tables of the same type. |
- Perform any of the Basic Actions mentioned in Navigation chapter.
- In the User Defined Table Attributes section, perform any of the Basic Operations mentioned in Navigation chapter.
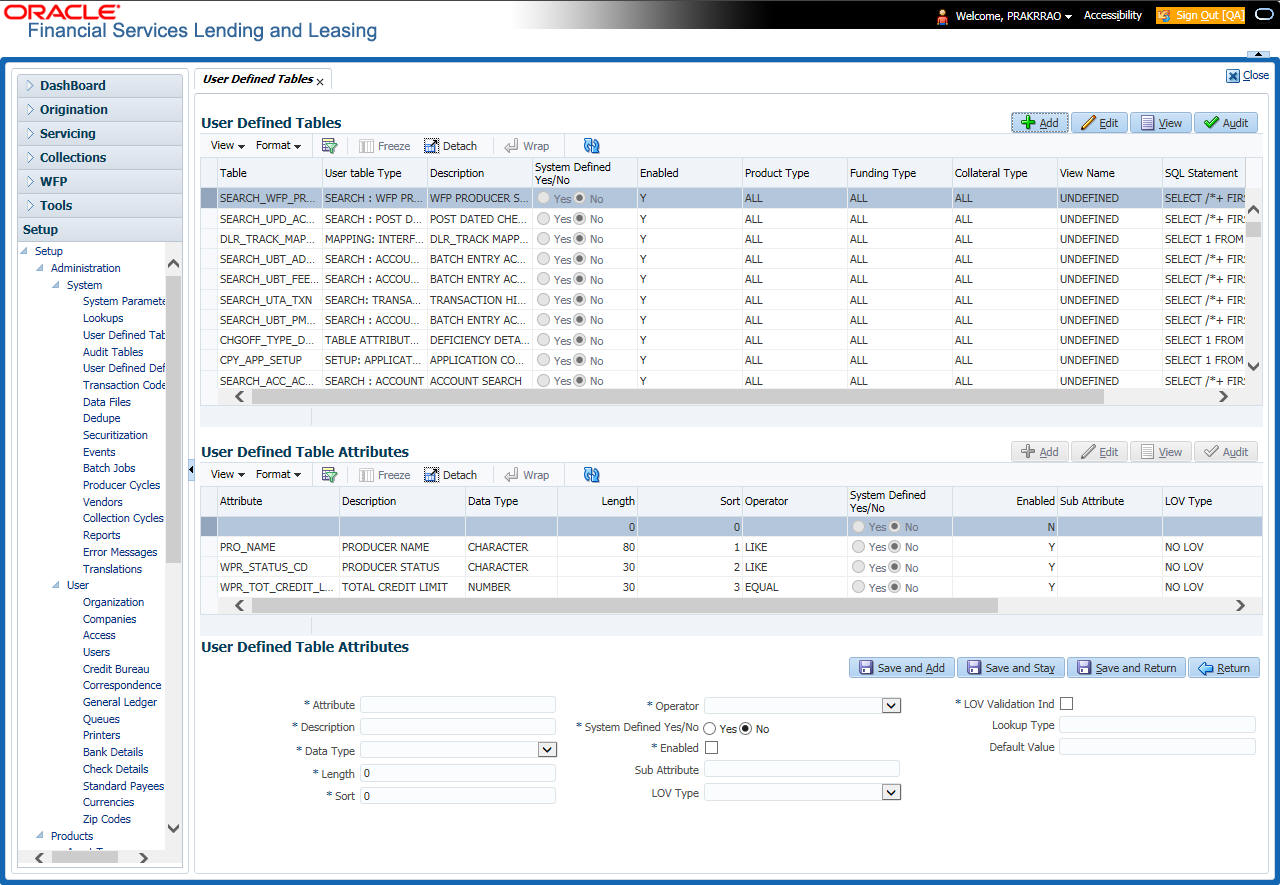
A brief description of the fields is given below:
Field |
Do this: |
Attribute |
Specify the user-defined table attribute. |
Description |
Specify the description for the user-defined table attribute. |
Data Type |
Select the data type for the attribute (CHARACTER, NUMBER, or DATE) from drop-down list. |
Length |
Specify the maximum length of the user-defined table attribute. |
Sort |
Specify the sort order of the user-defined table attribute. If the sort order is changed it will only affect new instances of the User Defined Table, and will not affect existing data. |
Operator |
Select the operator for the user-defined table attribute from the drop-down list. |
System Defined Yes/No |
Select ‘Yes’, if you wish to maintain the User table attribute as system defined and ‘No’, if you do not want to maintain it as system defined. System defined entries cannot be modified. If the entry is not system defined, then it can be modified. |
Enabled |
Check this box to enable the user-defined table attribute so that the attribute will be considered when creating new instances of the User Defined Table. |
Sub Attribute |
Specify the sub-attribute for the attribute (sub attributes are used to associate related attributes). |
LOV Type |
Select the list of value (LOV) type for the user-defined table attribute from the drop-down list. |
LOV Validation Ind |
Check this box to enable LOV validation of the user-defined table attribute. This indicates whether the data must come from the LOV. |
Lookup Types |
Specify the lookup type of the LOV associated with the user-defined table attribute. |
Default Value |
Specify the default value for the user-defined table attribute. |
- Perform any of the Basic Actions mentioned in Navigation chapter.
2.4 Audit Tables
The system allows you to track changes in the database during loan origination. This includes the tracking of:
- Account status history
- Audit history of specified fields
The Audit Tables Setup screen records the tables and columns requiring an audit. the system stores the following details for the fields you want to audit for changes:
- Current value in field
- New value field
- User who changed the field’s content
- Date and time when the value was changed
IMPORTANT: The system recommends that only a database administrator perform the following steps.
To set up the Audit Tables
- Click Setup > Setup > Administration > System > Audit Tables. The system displays the Audit Tables screen. The details are grouped into two:
- Audit Tables
- Audit Columns
- In the Audit Tables section, perform any of the Basic Operations mentioned in Navigation chapter.
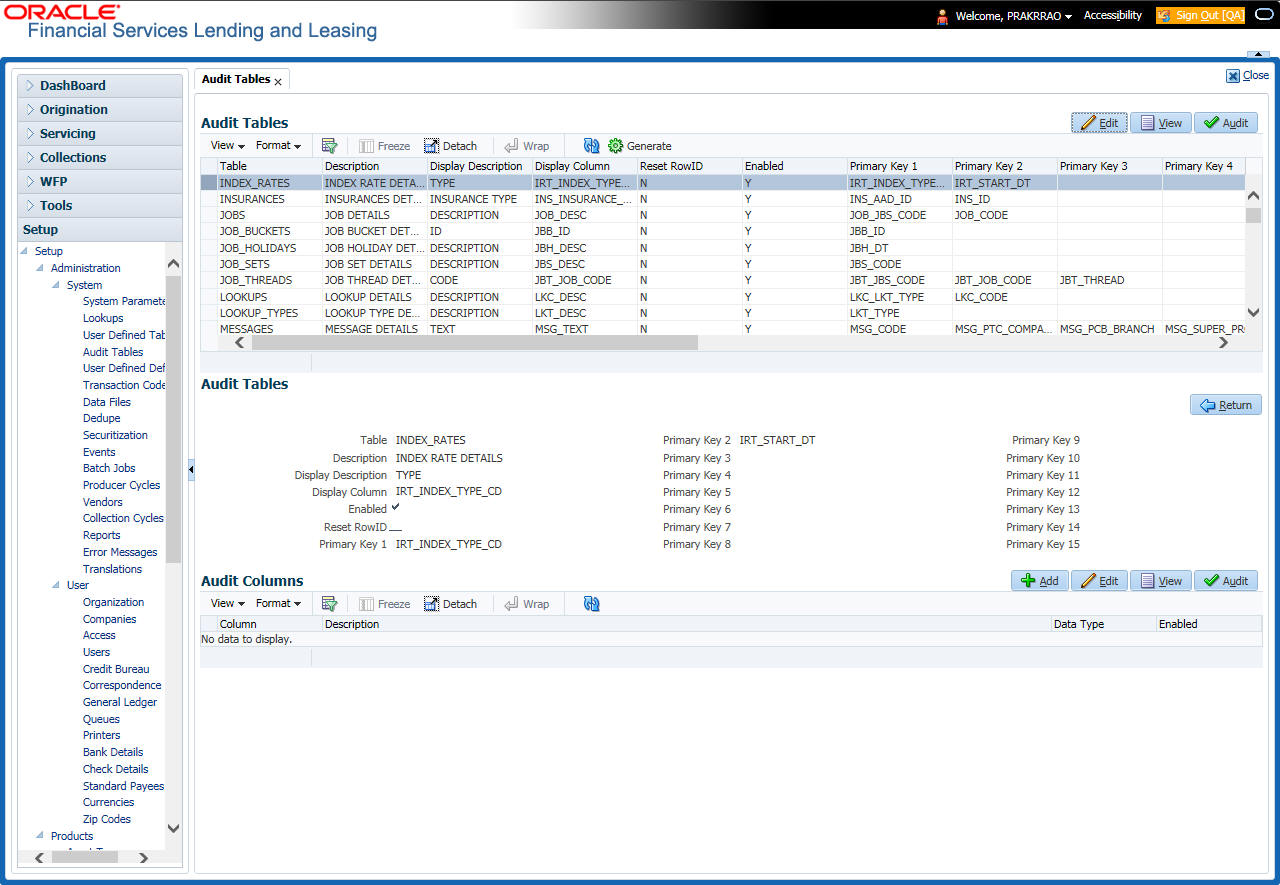
A brief description of the fields is given below:
Field |
Do this: |
Table |
The table name on which audit trigger needs to be created is displayed here (the system table being audited). |
Description |
Specify the table description. |
Display Description |
Specify the column description to be displayed on audit screen. |
Display Column |
Select the table column to be displayed on audit screen from the drop-down list. |
Enabled |
Check this box to enable the audit table so that it will be considered while generating the database triggers. |
Reset Row ID |
Check this box to allow resetting the row identifier. |
Primary Key 1 (unlabeled) |
The table primary key column 1 is displayed here. (These columns define how to access the data in the table.) |
Primary Key 2 (unlabeled) |
The table primary key column 2 is displayed here. |
Primary Key 3 (unlabeled) |
The table primary key column 3 is displayed here. |
Primary Key 4 (unlabeled) |
The table primary key column 4 is displayed here. |
Primary Key 5 (unlabeled) |
Table primary key column 5 is displayed here . |
Primary Key 6 (unlabeled) |
Table primary key column 6 is displayed here. |
Primary Key 7 (unlabeled) |
The table primary key column 7 is displayed here. |
Primary Key 8 (unlabeled) |
The table primary key column 8 is displayed here. |
Primary Key 9 (unlabeled) |
The table primary key column 9 is displayed here. |
Primary Key 10 (unlabeled) |
The table primary key column 10 is displayed here. |
Primary Key 11 (unlabeled) |
The table primary key column 11 is displayed here. |
Primary Key 12 (unlabeled) |
The table primary key column 12 is displayed here. |
Primary Key 13 (unlabeled) |
The table primary key column 13 is displayed here. |
Primary Key 14 (unlabeled) |
The table primary key column 14 is displayed here. |
Primary Key 15 (unlabeled) |
The table primary key column 15 is displayed here. |
- Perform any of the Basic Actions mentioned in Navigation chapter.
- In the Audit Tables Columns section, perform any of the Basic Operations mentioned in Navigation chapter.
A brief description of the fields is given below:
Field |
Do this: |
Column |
Specify the column name on which the audit needs to be created from drop-down list (column in the table that is being audited) |
Description |
Specify the column description (description of the data contained in the column). |
Data Type |
The data type for the attribute is displayed here. |
Enabled |
Check this box to enable the audit column. |
- Perform any of the Basic Actions mentioned in Navigation chapter.
2.5 Transaction Codes
The system uses transaction codes to define the actions and tasks it can perform; for example, activating an account, changing a due date, applying a late fee, and charging off an account.
The Transaction Codes Setup screen catalogs and defines these core system actions.
Three sub screens, Transaction Parameters, Access Grid, and Transaction Product Definition, record any additional information required to perform a transaction, the user types that can perform the transaction, and the product type to which the transaction codes apply.
Note
The Software recommends that you restrict the access to the seed data once you are in production.
To set up the Transaction Codes
- Click Setup > Setup > Administration > System > Transaction Codes. The system displays the Transaction Codes screen.
- In Transaction Super Group section, you can view the following information
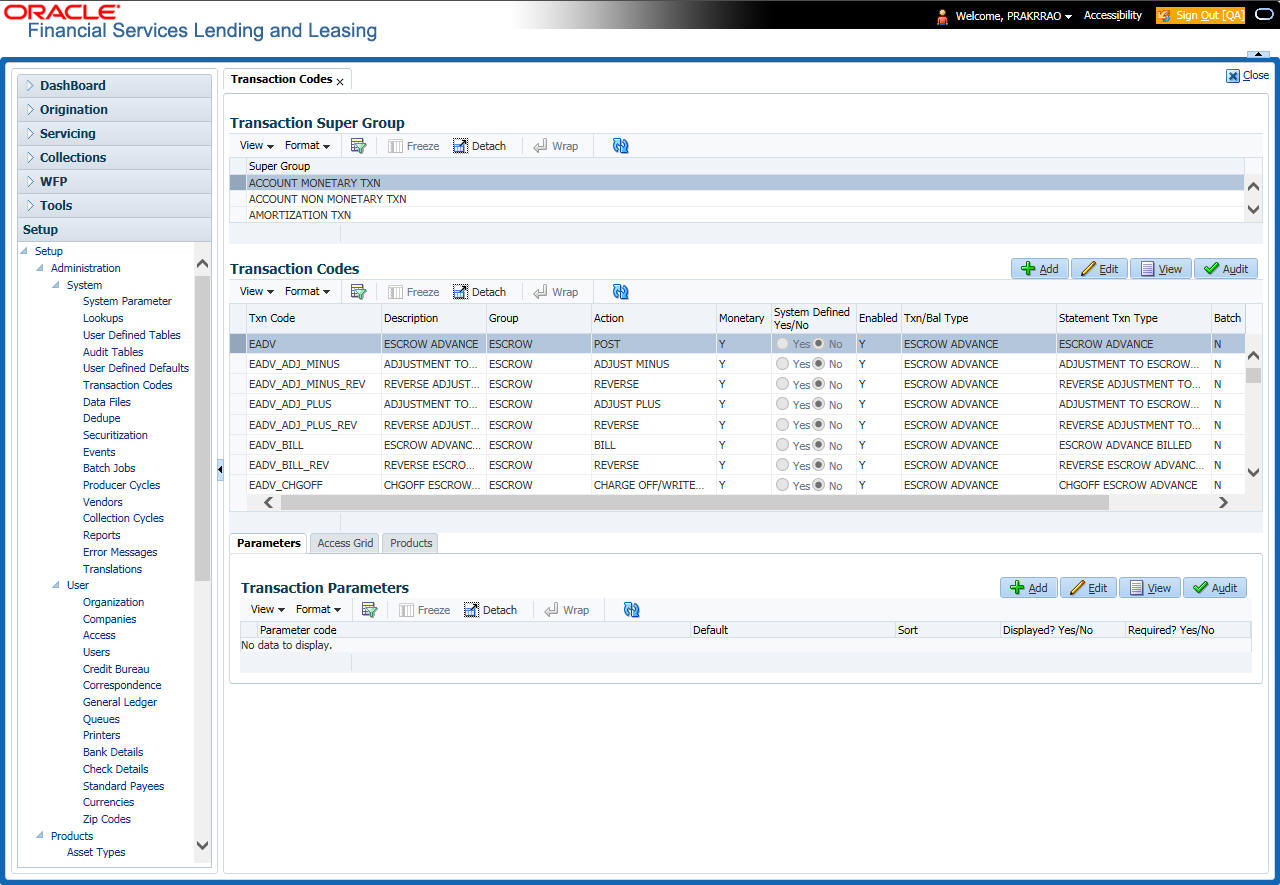
A brief description of the fields is given below:
Field |
Do this: |
Super Group |
Select the Super Group you want to work with in the Transaction Codes screen. |
- Perform any of the Basic Actions mentioned in Navigation chapter.
- In the Transaction Codes section, perform any of the Basic Operations mentioned in Navigation chapter
A brief description of the fields is given below:
Field |
Do this: |
Txn Code |
Specify the transaction code (required). |
Description |
Specify the description for the transaction. |
Group |
Select the transaction group (the group within the Transaction Super Group that the transaction code belongs to) from the drop-down list. |
Action |
Select the action type code for the transaction (what action will take place when the transaction occurs) from the drop-down list. |
Monetary |
Check this box to maintain the transaction as a monetary transaction. If unchecked, then the transaction is nonmonetary. |
System Defined Yes/No |
Select ‘Yes’, if you wish to maintain the transaction code as system defined and ‘No’, if you do not want to maintain it as system defined. System defined entries cannot be modified. If entry is not system defined, then it can be modified. |
Enabled |
Check this box to enable the transaction. |
Txn/Bal Type |
Select the transaction / balance type affected by the Transaction from the drop-down list. |
Statement Txn Type |
Select the statement transaction type (how the transaction should appear on the customer statement) from the drop-down list. |
Batch |
Check this box to perform the transaction in a batch process. |
Manual |
Check this box, if the transaction is a manual transaction. If you define a transaction as manual, the system recommends that the transaction that reverses it also be defined as manual. |
Stmt Print |
Check this box to print the transaction on customer statements. |
GL |
Check this box, if the transaction is a general ledger transaction. |
- Perform any of the Basic Actions mentioned in Navigation chapter.
2.5.1 Transaction Codes sub screens
The Transaction Codes screen contains three sub screens:
- Parameters
- Access Grid
- Products
Note
Please contact your System Administrator / Implementation Manager before making any changes in these sub screens.
2.5.1.1 Parameters
Here, you can define the parameter information for the associated transaction. The Parameters apply exclusively to these super groups:
- ACCOUNT MONETARY TXN
- ACCOUNT NON MONETARY TXN
- SECURITIZATION TXN
- ESCROW MONETARY TRANSACTIONS
- ESCROW NON MONETARY TRANSACTIONS
(For manual transactions, these are the parameters that appear when you click Load Parameters on the Customer Service screen’s Maintenance screen.)
Note
Treat the Transaction Parameters sub screen as containing view-only information. This is very sensitive data and you should not change it without consulting Oracle Financial Services Lending and Leasing.
To set up the Parameters
- Click Setup > Setup > Administration > System > Transaction Codes > Parameters.
- In the Transaction Parameters section, perform any of the Basic Operations mentioned in Navigation chapter.
A brief description of the fields is given below:
Field |
Do this: |
Parameter Code |
Select the parameter code associated with the transaction code, from the drop-down list. |
Default |
Specify the default value for the transaction parameter (value to initially populate, or used if no value is supplied). |
Sort |
Specify the sort order for the transaction parameter. |
Displayed? Yes/No |
Select ‘Yes’ to display the parameter and ‘No’ if you do not want to display in current use. |
Required? Yes/No |
Select ‘Yes’ if the parameter is required and ‘No’ if you do not require the parameter. (You must select Required as empty values are not allowed.) |
- Perform any of the Basic Actions mentioned in Navigation chapter.
2.5.1.2 Access Grid
The Access Grid sub screen allows you to control access to each transaction according to user responsibility, account status, and account condition. It allows the administrator to control when these transactions may be conducted. Normally, you would create or modify the access based on either the user responsibility or account condition. Account status access is left unchanged.
To set up the Access Grid sub screen
- Click Setup > Setup > Administration > System > Transaction Codes > Access Grid.
- In the Transaction User Access Definition section, perform any of the Basic Operations mentioned in Navigation chapter.
A brief description of the fields is given below:
Field |
Do this: |
Access Type |
Select the access grid function type (ACCOUNT CONDITION and ACCOUNT STATUS) that is being used to control the creation of the associated transaction, from the drop-down list. |
Access Value |
Select the access function grid value from the drop-down list (based on a lookup associated with the Access Type. Multiple entries for each access type may be created as long as each has a different access value). |
Allowed? Yes/No |
Select ‘Yes’ if the access is allowed and ‘No’ if the access is not allowed (indicates whether the current Access Type / Access Value may create the associated transaction). |
System Defined Yes/No |
Select ‘Yes’, if you wish to maintain access type as system defined and ‘No’, if you do not want to maintain it as system defined. System defined entries cannot be modified. If entry is not system defined, then it can be modified. |
- Perform any of the Basic Actions mentioned in Navigation chapter.
2.5.1.3 Products
The Products sub screen allows you to define the products to which the transaction codes apply. It allows the administrator to control if the associated transaction code will be available for use for specific product types and or funding types.
Normally, an Access Value of ALL is defined for one or more Access Types with a given Allowed value. Additional Access Values are then defined for the same Access Types with the opposite Allowed value. This controls access to the associated transaction.
To set up the Products sub screen
- Click Setup > Setup > Administration > System > Transaction Codes > Products.
- In the Transaction Product Definition section, perform any of the Basic Operations mentioned in Navigation chapter.
A brief description of the fields is given below:
Field |
Do this: |
Product Type |
Select the product type associated with the transaction code from the drop-down list. |
Funding Type |
Select the funding type associated with the transaction code from the drop-down list. |
Allowed? Yes/No |
Select ‘Yes’ if the transaction is allowed and ‘No’ if the transaction is not allowed (indicates whether the current Access Type / Access Value may create the associated transaction). |
- Perform any of the Basic Actions mentioned in Navigation chapter.
2.6 Data Files
The Data Files Setup screen organizes information pertaining to the various input/output data files that the system can generate. The system uses the Data Files Setup screen to outline the file layouts of each data file produced/received within the system, including the length and data type of each column name.
These files are typically produced during the nightly process.
One major advantage for the system-defined data files is the format mask of each column name within each data file. A format mask is like a stencil that forces data input to be of the same format before accepting the data.
You can change the order in which the fields are displayed in the file.
Note
Any addition or removal of a field or change in the data type length requires the Software involvement.
Data Files screen consists of the following two tabs:
- Output
- Input
2.6.1 Output tab
The Output tab in the Data Files screen allows you to define the structure of output data file through the following sections:
- Data File Definitions
- Record Definitions
- Column Definitions
2.6.1.1 Data File Definitions
The Data File Definitions section defines specific data files. Each is associated with a specific Output Data Definition (ODD) batch job that gathers the data that the file will contain. While new data file definitions may be created they will have no use unless a batch job is also created to populate the data.
To set up Data File Definitions
- Click Setup > Setup > Administration > System > Data Files > Outpout tab.
- In the Data Files Definitions section, perform any of the Basic Operations mentioned in Navigation chapter.
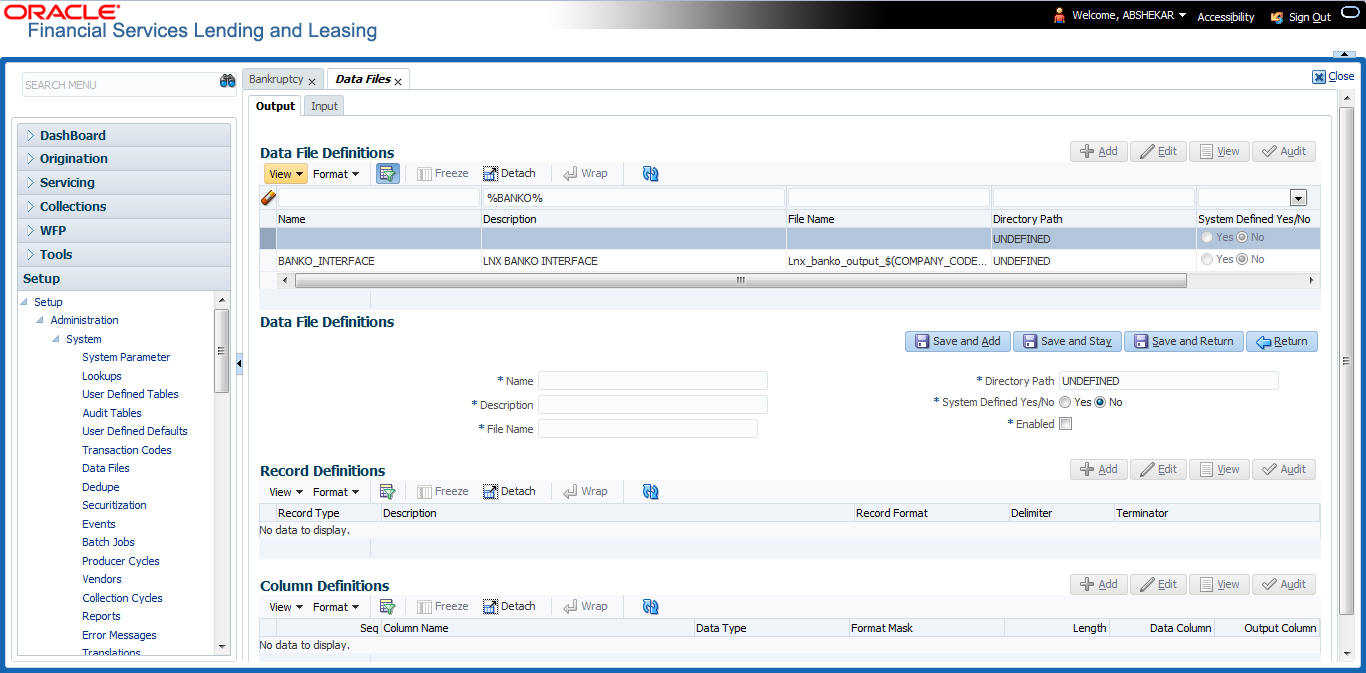
A brief description of the fields is given below:
Field |
Do this: |
Name |
Specify data file type (name of data file definition). |
Description |
Specify data file description. |
File Name |
Specify data file name. Prefix used for files generated for this Data File. This is the only field on the Data File Definitions screen that can or should be modified by your Administrator. The generated file name will be in the form of <File Name>_<Company ID>_<Branch ID>_<MMDDYYYY>_<Process ID>.dat. The inclusion of _<Company ID> and _<Branch ID> depends entirely on the associated batch process. |
Directory Path |
Specify the directory path. |
System Defined Yes/No |
Select ‘Yes’, if you wish to maintain the data file definition as system defined and ‘No’, if you do not want to maintain it as system defined. System defined entries cannot be modified. If the entry is not system defined, then it can be modified. |
Enabled |
Check this box to enable the data file definition. |
- Perform any of the Basic Actions mentioned in Navigation chapter.
2.6.1.2 Record Definitions
Each data file definition is made up of one or more record definitions. These define organization of the data. The associated batch file determines how these records are used. The order in which the data is populated determines the order in which those records will appear in the output file. This is generally related to the order the records appear in the Data File Definition section.
- In the Record Definitions section, perform any of the Basic Operations mentioned in Navigation chapter.
A brief description of the fields is given below:
Field |
Do this: |
Record Type |
Specify the type of record being defined. |
Description |
Specify record description. |
Record Format |
Select the format of output data (FIXED, VARIABLE) from the drop-down list. |
Delimiter |
Specify the delimiter (column separator used with VARIABLE format). |
Terminator |
Select the record terminator code (how the end of each record is indicated within the file -- CARRIAGE RETURN, LINE FEED, or CARRIAGE RETURN AND LINE FEED) from the drop-down list. |
- Perform any of the Basic Actions mentioned in Navigation chapter.
2.6.1.3 Column Definitions
Each record definition is made up of one or more column definitions. These define the output of the data. Much of this data is informational; it indicates what data is being provided by the associated batch job. Unless otherwise noted, the data should not be changed without changing the associated batch job.
- In the Column Definitions section, perform any of the Basic Operations mentioned in Navigation chapter.
A brief description of the fields is given below:
Field |
Do this: |
Seq |
Specify the order in which the output data dump will process the column information. |
Column Name |
Specify name/description of the column (informational only). |
Data Type |
Specify the data type. This describes the type of data the column is expected to contain (CHARACTER, DATE, or NUMBER). This effects how the ODD process handles the data, and should not be changed . |
Format Mask |
Select the format mask for the column from the drop-down list. For DATE or NUMBER columns, this field defines the output format of the data. For example; Date fields may be entered using the MM/DD/YYYY format, Number fields may be entered as decimal numbers with varying degrees of precision. Other formats for each data type are available. |
Length |
Specify the column length (the maximum number of characters of the output data to be included in the output file). Each output data details column may contain up to 240 characters of data. If the output data details column contains more data than the length value the data will be truncated. For VARIABLE records the length should be set to “-1” or a Delimited file will be created with FIXED LENGTH columns. |
Data Column |
Specify the data column sequence. This is the column that will be used to select the data that is being output. This should not be changed. |
Output Column |
Specify the output column sequence. This is the column that will appear in Output File. The Output Data Dump process allows for the output of 250 columns of data per record. No output column should be repeated in the setup for a record. |
- Perform any of the Basic Actions mentioned in Navigation chapter.
2.6.2 Input tab
Oracle Financial Services Lending and Leasing facilitates processing of a input data file received from external interface into the system through an automated batch job (IDDPRC_BJ_000_01) triggered on regular intervals.
The Input tab in the Data Files screen allows you to define the input data file through the following sections:
- Input Data File Definitions
- Column Definitions
2.6.2.1 Input Data File Definitions
In the Input Data File Definitions section, you can define and maintain the structure of input data file to populate data from external system.
To set up Input Data File Definitions
- Click Setup > Setup > Administration > System > Data Files > Input tab.
- In the Input Data Files Definitions section, perform any of the Basic Operations mentioned in Navigation chapter.
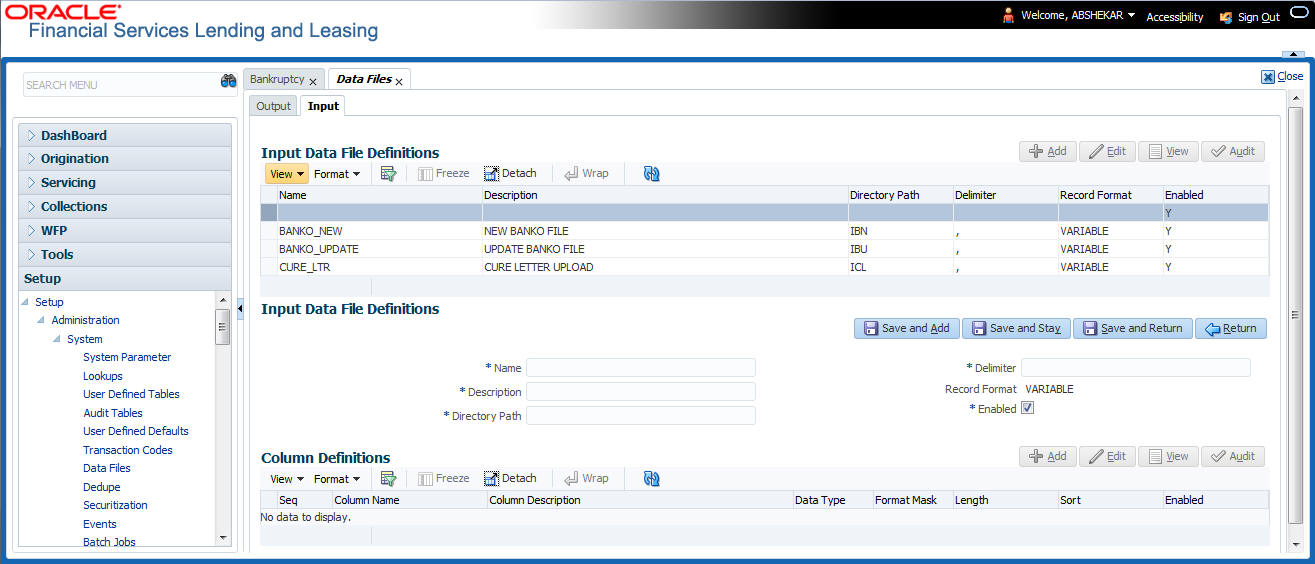
A brief description of the fields is given below:
Field |
Do this: |
Name |
Specify a unique name for the input data file. |
Description |
Specify data file description. |
Directory Path |
Specify the directory path configured within OFSLL Database server to process the input data file. |
Delimiter |
Specify the delimiter used to separate column data. (Ex: Comma). |
Record Format |
System defaults the record format as ‘VARIABLE’. |
Enabled |
Check this box to enable the input data file definition. |
- Perform any of the Basic Actions mentioned in Navigation chapter.
2.6.2.2 Column Definitions
Each input data file definition is made up of one or more column definitions. These define the structure of data to be loaded from external system.
- In the Column Definitions section, perform any of the Basic Operations mentioned in Navigation chapter.
A brief description of the fields is given below:
Field |
Do this: |
Seq |
Specify the order in which the input data dump will process the column information. |
Column Name |
Specify name of the column. |
Column Description |
Specify description of the column. |
Data Type |
Select the data type from the drop-down list. The selected data type describes the type of data the column is expected to contain such as INTEGER/DATE/NUMBER/CHARACTER. This effects how the input data file processing handles the data, and should not be changed. |
Format Mask |
Select the format mask for the column from the drop-down list. The list displays the format depending on the Data Type selected. For example; Date fields may be entered using the MM/DD/YYYY format, Number fields may be entered as decimal numbers with varying degrees of precision. Other formats for each data type are available. |
Length |
Specify the column length (the maximum number of characters of the data to be included in the input file). Each input data details column may contain up to 240 characters of data. If the output data details column contains more data than the length value the data will be truncated. For VARIABLE records the length should be set to “-1” or a Delimited file will be created with FIXED LENGTH columns. |
Sort |
Specify the order in which the column definitions are to be sorted for display in the external interface screen (Customer Service > External Interfaces). There can be a maximum of 61 column definitions. |
Enabled |
Default selected. If not, you can check this box to enable the column definition. |
- Perform any of the Basic Actions mentioned in Navigation chapter.
2.7 Events
During account processing, when an account moves from one status/sub status to another, or changes condition, the system can trigger an event and perform the associated event actions. This can occur either online or in batch mode.
Note
Only predefined events and actions can be set up on the Events Setup screen. You cannot create new event types or action types.
As processing events and associated actions require additional processing at the server level, the performance of the transactions, for which the events are setup, may be adversely affected dependent upon your specific configuration.
2.7.1 Events
In the Events screen you can setup “trigger events” with associated actions which the system performs during account processing. The fields on this form are both system and user defined. There are four sub screens on the Events screen to set up and maintain these events:
- Events Types
- Event Action Types
- Online
- Batch
Event Types and Action Types sections of this screen provide a master table for setting up the online and batch events. This setup triggers the event, which in turn triggers the actions associated with the events, during account processing.
Navigating to Events
- On the Oracle Financial Services Lending and Leasing home screen, click Setup > Setup > Events.
2.7.1.1 Event Types
- Click Setup > Setup > Administration > System > Events > Lease > Events Types.
- In the Events Type section, perform any of the Basic Operations mentioned in Navigation chapter.
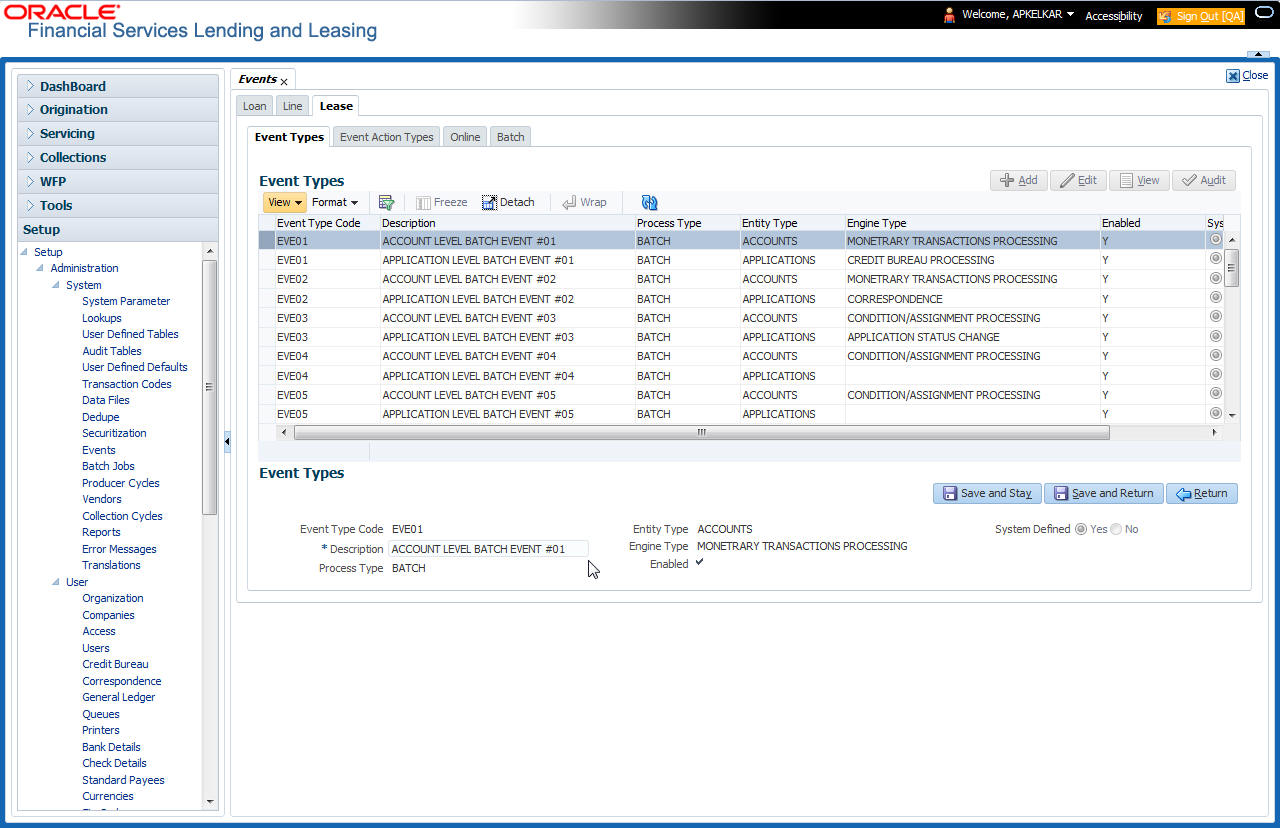
A brief description of the fields is given below:
Field: |
Do this: |
Event Type Code |
Specify the event type code. |
Description |
Specify the event description. |
Process Type |
Specify the process type (BATCH or ONLINE) from the drop-down list. |
Entity Type |
Specify the entity type (ACCOUNTS or APPLICATIONS) from the drop-down list. |
Engine Type |
Specify the engine type (MONETARY TRANSACTIONS PROCESSING, NON-MONETARY TRANSACTION PROCESSING, CONDITION/ASSIGNMENT PROCESSING, APPLICATION STATUS CHANGE, CREDIT BUREAU PROCESSING, LETTERS PROCESSING or CORRESPONDENCE) from the drop-down list. |
Enabled |
Check this box to activate the event type. |
System Defined |
Select ‘Yes’ to indicate that the event type is system define. Select ‘No’ to indicate that the event type is user defined. |
- Perform any of the Basic Actions mentioned in Navigation chapter.
2.7.1.2 Event Action Type
The Event Action Types section is system defined and lists the action codes supported in the system.
- Click Setup > Setup > Administration > System > Events > Lease > Event Action Types.
- In the Events Action Types section, perform any of the Basic Operations mentioned in Navigation chapter.
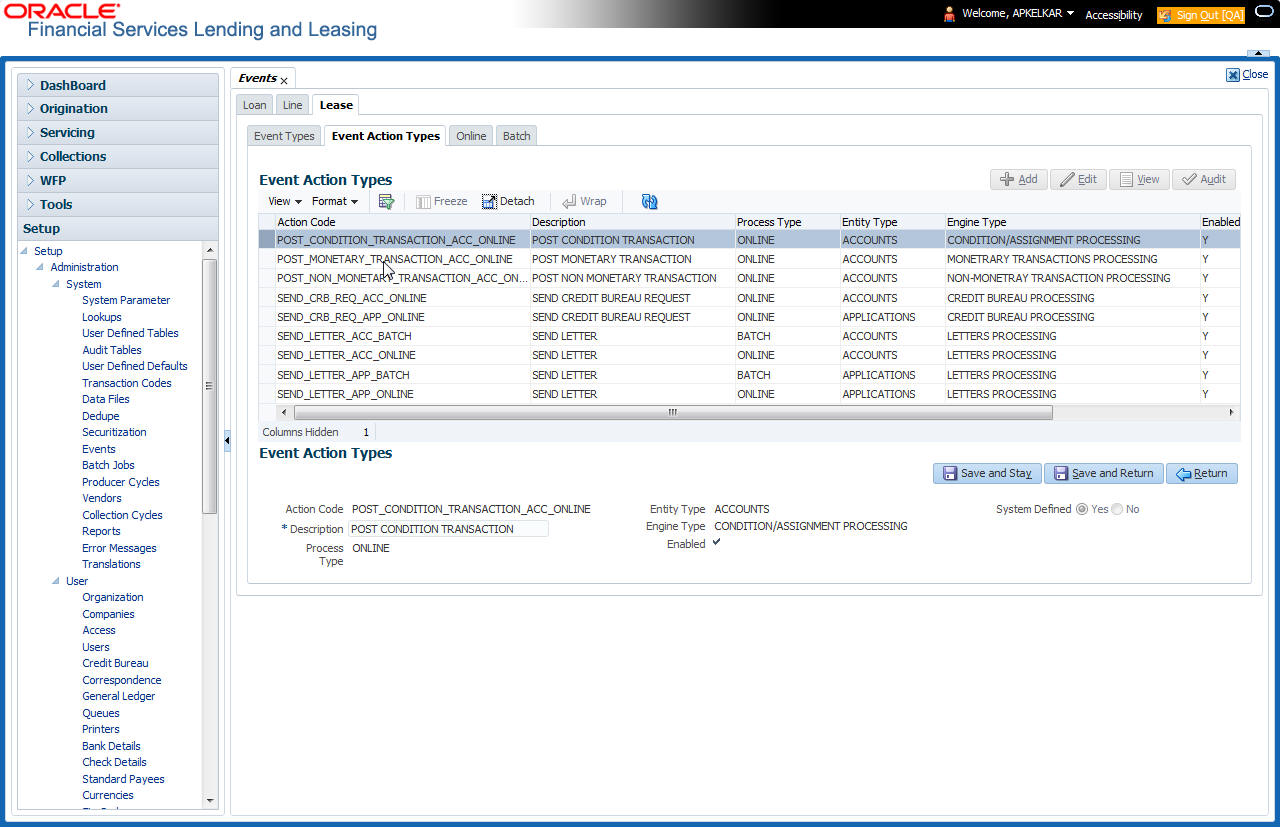
A brief description of the fields is given below:
Field: |
Do this: |
Action Code |
Specify the action code. |
Description |
Specify the action description. |
Process Type |
Select the process type (BATCH or ONLINE) from the drop-down list. |
Entity Type |
Select the entity type from the drop-down list. |
Engine Type |
Select the engine type from the drop-down list. |
Enabled |
Check this box to activate the action. |
System Defined |
Select ‘Yes’ to indicate that the event type is system define. Select ‘No’ to indicate that the event type is user defined. |
- Perform any of the Basic Actions mentioned in Navigation chapter.
2.7.1.3 Online
The Online screen allows you to set up the online events by defining all online events and the event criteria actions. The system supports the following online events:
- A change in account’s status. the system processes the event's actions when the:
- Account status of ACTIVE is reversed
- Account status is changed to PAID
- Account status change to PAID is reversed
- Account status is changed to CHARGE OFF
- Account status change to CHARGE OFF is reversed.
- The opening or closing of an accounts conditions. The system processes the event’s actions when the:
- Account condition Delinquent is opened
- Account condition Delinquent is closed
- CHG OFF Reversal
- Paid Off Reversal
- BKRP is closed
- BKRP Is Opened
- When Queue is Closed
- When status/ Sub status changed to 'Approved- Rehashed'
- Account condition SCHG is closed
- Account condition SCHG is Opened
- The posting of a non-monetary transaction to the account.
The events that can be performed online after each of the events listed above are as follows:
- Send correspondence for an account
- Generate correspondence for an account
- Send a credit bureau request for an account
- Post a monetary transaction for an account
- Post a condition transaction for an account
To setup Online Event
- Click Setup > Setup > Administration > System > Events > Lease > Online.
- In the Events section, perform any of the Basic Operations mentioned in Navigation chapter.
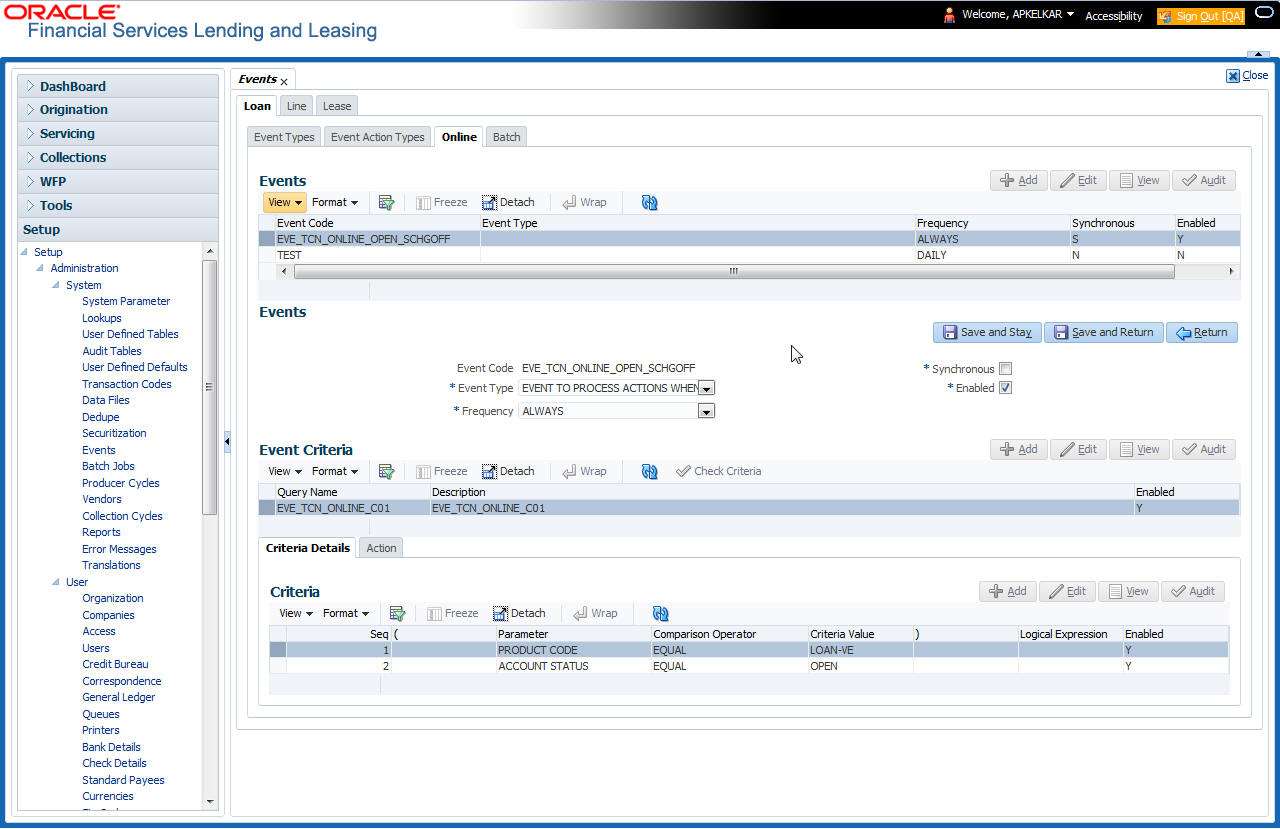
A brief description of the fields is given below:
Field: |
Do this: |
Event Code |
Specify the event code. |
Event Type |
Specify the event type from the drop-down list. |
Frequency |
Specify the event frequency from the drop-down list. |
Synchronous |
Check this box to set the event as synchronous (any failure in triggering the event will fail to trigger the entire transaction). If unchecked, then the event is asynchronous (any failure in the event will not affect the transaction, which will be successfully completed). |
Enabled |
Check this box to activate the event type. |
- Perform any of the Basic Actions mentioned in Navigation chapter.
The Event Criteria section allows you to name and describe the query for an event, as well as enable or disable the query.
- In the Event Criteria section, perform any of the Basic Operations mentioned in Navigation chapter.
A brief description of the fields is given below:
Field: |
Do this: |
Query Name |
Specify the query name. |
Description |
Specify the query description. |
Enabled |
Check this box to activate the event criteria. |
- Perform any of the Basic Actions mentioned in Navigation chapter.
Criteria Details
The Criteria Details sub screen allows you to define the selection criteria for the event. The event engine uses these criteria to determine which account to include in the event action.
- In the Setup > Setup > Administration > System > Events > Lease > Online > Criteria section, you can define the event selection criteria. Perform any of the Basic Operations mentioned in Navigation chapter.
A brief description of the fields is given below:
Field: |
Do this: |
Seq |
Specify sequence numbers. |
( |
Specify left bracket. |
Parameter |
Select the parameter from the drop-down list. |
Comparison Operator |
Select comparison operator from the drop-down list. |
Criteria Value |
Specify criteria value. |
) |
Specify right bracket. |
Logical Expression |
Specify logical operator from the drop-down list. |
- Perform any of the Basic Actions mentioned in Navigation chapter.
Actions
The Actions section records the actions the system performs after the event is triggered.
- In the Setup > Setup > Administration > System > Events > Lease > Online > Action section, define the action you want the system to perform for the event by entering the following information. (You can set up more than one event action for a particular event, then use the Seq field to define the order in which the events will occur)
A brief description of the fields is given below:
Field: |
Do this: |
Description |
Select the event action description from the drop-down list. |
Seq |
specify sequence number. |
Enabled |
Check this box to activate the event action. |
- Perform any of the Basic Actions mentioned in Navigation chapter.
- For each event action, use the Action Parameters section to set up the required action parameters and values. Perform any of the Basic Operations mentioned in Navigation chapter.
A brief description of the fields is given below:
Field: |
Do this: |
Description |
Specify the parameter description from the drop-down list. |
Value |
Specify parameter value. |
- Perform any of the Basic Actions mentioned in Navigation chapter.
2.7.1.4 Batch
The Batch screen allows you to set up the events performed as a batch transaction by the system. The system supports the following predefined batch events for account processing. (These batch events are listed in the Events Types section on the Setup screen):
- ACCOUNT LEVEL BATCH EVENT #01
- ACCOUNT LEVEL BATCH EVENT #02
- ACCOUNT LEVEL BATCH EVENT #03
- ACCOUNT LEVEL BATCH EVENT #04
- ACCOUNT LEVEL BATCH EVENT #05
- ACCOUNT LEVEL BATCH EVENT #06
- ACCOUNT LEVEL BATCH EVENT #07
- ACCOUNT LEVEL BATCH EVENT #08
- ACCOUNT LEVEL BATCH EVENT #09
- ACCOUNT LEVEL BATCH EVENT #10
To setup the Batch Event
- Click Setup > Setup > Administration > System > Events > Lease > Batch.
- In the Events section, perform any of the Basic Operations mentioned in Navigation chapter.
A brief description of the fields is given below:
Field: |
Do this: |
Event Code |
Specify the event code. |
Event Type |
Specify the event type from the drop-down list. |
Frequency |
Specify the event frequency from the drop-down list. |
Synchronous |
Check this box to set the event as synchronous (any failure in triggering the event will fail to trigger the entire transaction). If unchecked, then the event is asynchronous (any failure in the event will not affect the transaction, which will be successfully completed). |
Enabled |
Check this box to activate the event type. |
- Perform any of the Basic Actions mentioned in Navigation chapter.
The Events Criteria section allows you to name and describe the query for an event, as well as enable or disable the query.
- In the Events Criteria section, perform any of the Basic Operations mentioned in Navigation chapter.
A brief description of the fields is given below:
Field: |
Do this: |
Query Name |
Specify the query name. |
Description |
Specify the query description. |
Enabled |
Check this box to activate the event criteria. |
- Perform any of the Basic Actions mentioned in Navigation chapter.
Criteria Details
The Criteria Details sub screen allows you to define the selection criteria for the event. The event engine uses these criteria to determine which account to include in the event action.
- In the click Setup > Setup > Administration > System > Events > Lease > Batch > Criteria section, you can define the event selection criteria. Perform any of the Basic Operations mentioned in Navigation chapter.
A brief description of the fields is given below:
Field: |
Do this: |
Seq |
Specify sequence numbers. |
( |
Specify left bracket. |
Parameter |
Select the parameter from the drop-down list. |
Comparison Operator |
Select comparison operator from the drop-down list. |
Criteria Value |
Specify criteria value. |
) |
Specify right bracket. |
Logical Expression |
Specify logical operator from the drop-down list. |
- Perform any of the Basic Actions mentioned in Navigation chapter.
Action
The Action sub screen allows you to define the actions performed in the batch event. The system supports the following batch event actions:
- Send letter for an account
- Generate correspondence for an account
- Click Setup > Setup > Administration > System > Events > Lease > Batch > Action.
- In the Actions section, define the action you want the system to perform for the event by entering the following information. (You can set up more than one event action for a particular event, then use the Seq field to define the order in which the events will occur.) Perform any of the Basic Operations mentioned in Navigation chapter.
A brief description of the fields is given below:
Field: |
Do this: |
Description |
Select the event action from the drop-down list. |
Seq |
Specify sequence numbers (required). |
Enabled |
Check this box to activate the event action. |
- Perform any of the Basic Actions mentioned in Navigation chapter.
- For each event action, use the Action Parameters section to set up the required action parameters and values. Perform any of the Basic Operations mentioned in Navigation chapter.
A brief description of the fields is given below:
Field: |
Do this: |
Description |
Select the event action from the drop-down list. |
Value |
Specify sequence numbers (required). |
- Perform any of the Basic Actions mentioned in Navigation chapter.
2.7.1.5 Monitoring Events
You can verify the status of events and event actions on the Monitor Jobs screen of the Utilities form.
To monitor events
- On the Oracle Financial Services Lending and Leasing home screen, click Dashboard > Dashboard > System Monitor > Jobs > Back Ground.
The system displays the status for all asynchronous events that have been completed or failed for an account.
For further details, on monitoring events refer Dashboard Chapter of this Guide.
2.8 Batch Jobs
“Batch jobs” refer to the back-end processes that automatically run at a certain time. There are two types of batch jobs:
- Business processes (such as billing and delinquency processing)
- Housekeeping tasks (such as application aging and application purging)
2.8.1 Batch Jobs
The Batch Job screen allows you to set up, monitor, and maintain batch jobs in the system.
Batch jobs can be set up to be performed on a daily, weekly, monthly, and ad-hoc basis. Batch jobs can also be configured to trigger an e-mail or phone message if a batch job fails.
Critical batch jobs control job flow and system date rollover to allow recovery during errors. Errors are instances where a process did not successfully complete. Failures indicate that a particular job encountered errors that require remedial action. The number of errors allowed before failure is defined for each job. Some errors automatically result in a failure.
Navigating to Batch Jobs:
- On the Oracle Financial Services Lending and Leasing home screen, click Setup > Setup > Administration > System > Batch Jobs. The Batch Jobs details are further grouped into two tabs:
- Batch Jobs tab
- Job Holidays tab
2.8.1.1 Batch Jobs
In the Batch Job Setup screen, you can track and maintain all batch processes within the system. Using this form, the system administrator can configure the frequency and start time of each batch process, as well as set the number of threads to improve performance.
“Threading” allows a specific job to be separated into smaller units that are processed at the same time. This allows Oracle Financial Services Lending and Leasing to complete the job in less time.
You can set up multiple batch jobs within a batch set. In the Batch Job Sets section, each process is listed with the last run date (Last Run Dt field) and the next scheduled process date (Next Run Dt field). In the Freq Code and Freq Value fields, you can determine the frequency of each batch set, such as daily, weekly and monthly. You can also set up batch sets to incorporate a dependency on another batch set. This way, if the initial batch fails, the dependent set will not be processed.
In the Batch Jobs section, you can configure the process to run on weekends and holidays using the respective option boxes.
CAUTION: As the batch job setup widely affects the Oracle Financial Services Lending and Leasing system, Oracle Financial Services Software suggests that the system administrator has a clear understanding of the various functionalities within Oracle Financial Services Lending and Leasing before creating and updating the batch processes.
For the standard job set please review the Visio document, dbk_std_detail_design_job_sets.vsd
To setup a Batch job
- Click Setup > Setup > Administration > System > Batch Jobs.
- In the Batch Job Sets section, perform any of the Basic Operations mentioned in Navigation chapter.
A brief description of the fields is given below:
Field: |
Do this: |
Set Code |
Specify the code for the batch job set. |
Job Set Description |
Specify the description for the batch job set. |
Frequency |
Select the frequency at which the job set is to be executed from the drop-down list. |
Frequency Value |
Select the frequency value from the drop-down list. The frequency value will be displayed based on the frequency code selected. |
Start Time |
Specify the start time for the job set. |
Critical |
Check this box to set job as critical. A “critical” job is one that prevents the General Ledger (GL) post date from rolling forward, should the job fail. |
Enabled |
Check this box to enable the job set. |
Last Run Dt |
The system displays the last run date of the job set. |
Next Run Dt |
Specify the next run date for job set. You can select the data from adjoining calendar icon. |
Parent |
Select the parent job set from drop-down list. |
Dependency |
Select the type of dependency on the parent from drop-down list. |
- Perform any of the Basic Actions mentioned in Navigation chapter.
- In the Batch Job section, perform any of the Basic Operations mentioned in Navigation chapter.
A brief description of the fields is given below:
Field: |
Do this: |
Seq |
Specify the batch job sequence number. Note: Within a job set, jobs are executed sequentially based on the sequence number assigned. |
Job Type |
Select the batch job request type from the drop-down list. |
Job Code |
Specify the batch job request code. |
Job Description |
Specify the batch job description. |
Threads |
The system displays the number of threads used by the job. |
Commit Count |
Specify the number of rows after which auto-commit is triggered. |
Errors Allowed |
Specify the number of errors allowed. |
Weekend |
Check this box to perform batch jobs on weekend. |
Holiday |
Check this box to perform batch jobs on a holiday. (Holidays are defined on the Job Holidays screen.) |
Enabled |
Check this box to enable the batch job. |
Parent |
Select the parent batch job from the drop-down list. |
Dependency |
Select the dependency clause of the batch job from the drop-down list. |
Command |
Specify the command line for the job (required). |
RollbackSegment |
If you choose, use this field to specify the rollback segment for job. |
- Perform any of the Basic Actions mentioned in Navigation chapter.
- In the Batch Job Thread section, perform any of the Basic Operations mentioned in Navigation chapter.
A brief description of the fields is given below:
Field: |
Do this: |
Thread |
Specify the name of thread. |
Trace |
Specify the SQL trace level (0, 1, 4, 8, 12). The higher the number, the more activities the system can trace. |
Enabled |
Check this box to enable the thread. |
- Perform any of the Basic Actions mentioned in Navigation chapter.
2.8.1.2 Job Holidays
The system allows you to define holidays within the company on Job Holidays screen. You can then use the Batch jobs screen to set up whether you want the system to perform batch jobs on these days or not, using the Holiday box of Batch Jobs section .
To define job holidays
- Click Setup > Setup > Administration > System > Batch Jobs > Job Holidays.
- In the Job Holidays section, perform any of the Basic Operations mentioned in Navigation chapter.
A brief description of the fields is given below:
Field: |
Do this: |
Holiday Dt |
Specify the date of the job holiday. You can select the date from the adjoining calendar icon. |
Description |
Specify the job holiday description (required). |
Enabled |
Check this box to enable the holiday. |
- Perform any of the Basic Actions mentioned in Navigation chapter.
2.8.2 Batch Jobs Available
The below table provides a list of Batch Jobs maintained in the system and a brief description to each:
Engine Type |
Description |
Batch Job |
Description |
Origination |
Servicing |
Collection |
Product Type |
Comment |
AAE |
Application Account Interface |
aaiprc_bj_100_01 |
APPLICATION TO ACCOUNT INTERFACE |
No |
Yes |
No |
Common |
This process periodically picks up applications in 'Approved-Verified' status and creates accounts. |
ACH |
ACH Accounts |
acaprc_bj_100_01 |
ACCOUNT ACH PROCESSING |
No |
Yes |
No |
Common |
This process produces the ACH file for the eligible customer payments. |
ACH |
ACH Producers |
acpprc_bj_100_01 |
PRODUCER ACH PROCESSING |
Yes |
Yes |
No |
Common |
This process produces the ACH file for the eligible producer payments. |
ACH |
ACH Vendors |
acvprc_bj_100_01 |
VENDOR ACH PROCESSING |
No |
Yes |
No |
Common |
This process produces the ACH file for the eligible vendor payments. |
ACH |
ACH Producer/Vendors/Customer/Third Party |
acxprc_bj_100_01 |
ACH Producer/Vendors/Customer/Third Party |
Yes |
Yes |
No |
Common |
This process producers the ACH file for the eligible Producer/Vendors/Customer/Third Party |
AGE |
Aging Applications |
agaapp_bj_100_01 |
APPLICATION AGING PROCESS |
Yes |
No |
No |
Common |
This process puts applications into 'Aged-Application' substatus. |
AGE |
Aging Contracts |
agccon_bj_100_01 |
CONTRACT AGING PROCESS |
Yes |
No |
No |
Common |
This process puts contracts into 'Aged-Contract' substatus. |
ALT-PFS |
ALLOTMENT EXTRACT FILE DUMP |
PFSEFTPRC_BJ_111_01 |
BACKUP EFT |
No |
Yes |
No |
Common |
This process creates the Backup EFT file |
ALT-PFS |
ALLOTMENT EXTRACT FILE DUMP |
PFSLBAPRC_BJ_100_01 |
POSTING ALLOTMENT PAYMENTS |
No |
Yes |
No |
Common |
This process posts the payments from the allotment file received from the bank |
ALT-PFS |
ALLOTMENT EXTRACT FILE DUMP |
PFSODDALT_BJ_100_01 |
ALLOTMENT EXTRACT FILE DUMP |
No |
Yes |
No |
Common |
This process sends the allotment draft notice to the bank |
ALT-PFS |
ALLOTMENT EXTRACT FILE DUMP |
PFSNSFPRC_BJ_100_01 |
NSF BATCH |
No |
Yes |
No |
Common |
This process posts the NSF file received from the bank |
API |
API Accounts |
accaai_bj_100_01 |
API AAI |
No |
Yes |
No |
Common |
This process creates accounts from validated conversion applications/contracts |
API |
API Accounts |
accdmp_bj_100_01 |
MOVE API_XX TO ITABS |
No |
Yes |
No |
Common |
This process copies data from conversion API tables to conversion applications table |
API |
API Accounts |
accval_bj_111_01 |
VALIDATE ITABS (LOAN) |
No |
Yes |
No |
Loan |
This process validate all conversion applications loan accounts by running the edits |
API |
API Accounts |
accval_bj_112_01 |
VALIDATE ITABS (LINE) |
No |
Yes |
No |
Line |
This process validate all conversion applications line of credit accounts by running the edits |
API |
API Accounts |
acmprc_bj_100_01 |
LOAD API_COMMENTS |
No |
Yes |
No |
Common |
This process creates account comments from conversion applications/contracts |
COL |
Appointment Cancellation |
capprc_bj_100_01 |
APPPOINTMENT CANCEL PROCESSING |
No |
Yes |
Yes |
Common |
This process cancels all the expired appointments. |
COL |
Payment Promise Processing |
cppprc_bj_100_01 |
BROKEN PROMISE PROCESSING |
No |
Yes |
No |
Common |
This process updates any broken promises as of the run time. |
CRB |
Credit Bureau Reporting |
cbuutl_bj_100_01 |
CREATE METRO2 FILE |
No |
Yes |
No |
Common |
This process creates the METRO2 file for Credit Bureau reporting for the specified date. |
DOT |
Document Tracking Load |
dolprc_bj_000_01 |
ACCOUNT DOCUMENT LOAD |
No |
Yes |
Yes |
Common |
This process reads acct_doc_load directory. Attach the documents to specified accounts and move documents to appropriate directory |
DLX |
Accounts Dialer Exclusion |
ODXPRC_BJ_100_01 |
ACCOUNTS DIALER EXCLUSION |
N |
Y |
Y |
Common |
This process generates a dialer exclusion file with account details and checks if the maintained call action result entry is made on any account during the specified time interval. |
GLP |
GL Interface |
gliprc_bj_100_01 |
GL SUMMARIZATION |
No |
Yes |
No |
Common |
This process summarizes GL transactions for the day. |
GOV |
Debt Reporting IRS 1099A /1099C |
gdraap_bj_100_01 |
IRS 1099-A PROCESSING |
No |
Yes |
No |
Common |
This process generates the 1099-A flat file for government reporting. |
GOV |
Debt Reporting IRS 1099A /1099C |
gdrcad_bj_100_01 |
IRS 1099-C PROCESSING |
No |
Yes |
No |
Common |
This process generates the 1099-C flat file for government reporting. |
GOV |
HMDA Reporting |
ghrprc_bj_100_01 |
IRS HMDA PROCESSING |
Yes |
No |
No |
Common |
This process generates the HMDA flat file for government reporting. |
GOV |
Interest Reporting IRS 1098 |
girprc_bj_100_01 |
IRS 1098 PROCESSING |
No |
Yes |
No |
Common |
This process generates the 1098 flat file for government reporting. |
JOB |
Scheduler |
jsctst_bj_000_01 |
Scheduler |
Yes |
Yes |
Yes |
Common |
This process test the job scheduler |
LBP |
Lockbox |
lbxprc_bj_100_01 |
LOAD LOCKBOX PROCESSING |
No |
Yes |
No |
Common |
This process loads any lockbox files available. This process can be set to run periodically throughout the day. |
LNT |
Lien Tracking |
OFDPRC_BJ_111_03 |
OUTPUT LIEN TRACKING FOR DATA CHANGE |
N |
Y |
N |
Common |
This process generates output file with changes in customer information such as Address/Phone no./Borrower/Co-borrower name. |
LNT |
Lien Tracking |
OFDPRC_BJ_111_04 |
OUTPUT LIEN TRACKING FOR VOID ACCOUNT |
N |
Y |
N |
Common |
This process generates output file for 'Void Accounts' to be sent to dealer track. |
LTR |
Collections Letter |
lcolt1_bj_100_01 |
GENERATE FIRST COLLECTION LETTER |
No |
No |
Yes |
Common |
This process generates the first collection letter for eligible accounts. |
LTR |
Collections Letter |
lcolt2_bj_100_01 |
GENERATE SECOND COLLECTION LETTER |
No |
No |
Yes |
Common |
This process generates the second collection letter for eligible accounts. |
LTR |
Collections Letter |
lcolt3_bj_100_01 |
GENERATE THIRD COLLECTION LETTER |
No |
No |
Yes |
Common |
This process generates the third collection letter for eligible accounts. |
LTR |
Customer Service Letter |
lcspdf_bj_111_01 |
PAID IN FULL LETTER |
No |
Yes |
No |
Loan |
This process generates the paid-in-full letter for the relevant accounts. |
LTR |
Customer Service Letter |
lcspoq_bj_111_01 |
PAYOFF QUOTE LETTER |
No |
Yes |
No |
Common |
This process generates the payoff quote letter for the requested accounts. |
LTR |
Customer Service Letter |
lcsstm_bj_100_01 |
CUSTOMER STATEMENT LETTER |
No |
Yes |
No |
Common |
This process generates the customer statement letter for requested accounts. |
LTR |
Customer Service Letter |
lcswel_bj_111_01 |
WELCOME LETTER |
No |
Yes |
No |
Loan |
This process generates the welcome letter for the newly funded accounts. |
LTR |
Origination Letter |
loraco_bj_111_01 |
Origination Adverse Action Letter(Conditional) (Loan) |
Yes |
No |
No |
Loan |
This process generates the adverse action letter for relevant applications. |
LTR |
Origination Letter |
loradv_bj_111_01 |
Origination Adverse Action Letter (Loan) |
Yes |
No |
No |
Loan |
This process generates the adverse action letter for relevant applications. |
ODD |
Coupon Book Dump File |
ocnprc_bj_100_01 |
CUSTOMER COUPON BOOK GENERATION |
No |
Yes |
No |
Common |
This process generates coupon books, if appropriate. |
ODD |
Output Data Dump File |
oddprc_bj_000_01 |
CREATE OUTPUT DATA DUMP FILES |
Yes |
Yes |
Yes |
Common |
This process creates any defined output data dump files set in the system. |
ODD |
Collections Letter |
olclt1_bj_100_01 |
COLLECTION LETTER 1 FILE CREATION |
No |
No |
Yes |
Common |
This process generates the first collection letter for eligible accounts. |
ODD |
Collections Letter |
olclt2_bj_100_01 |
COLLECTION LETTER 2 FILE CREATION |
No |
No |
Yes |
Common |
This process generates the second collection letter for eligible accounts. |
ODD |
Collections Letter |
olclt3_bj_100_01 |
COLLECTION LETTER 3 FILE CREATION |
No |
No |
Yes |
Common |
This process generates the third collection letter for eligible accounts. |
ODD |
Origination Letter |
oloaco_bj_100_01 |
ADVERSE ACTION CONDITIONAL LETTER FILE CREATION |
Yes |
No |
No |
Common |
This process generates the adverse action letter for relevant applications. |
ODD |
Origination Letter |
oloadv_bj_100_01 |
ADVERSE ACTION LETTER FILE CREATION |
Yes |
No |
No |
Common |
This process generates the adverse action letter for relevant applications. |
ODD |
Customer Service Letter |
olspdf_bj_100_01 |
PAID IN FULL FILE CREATION |
No |
Yes |
No |
Common |
This process generates the paid-in-full letter for the relevant accounts. |
ODD |
Customer Service Letter |
olspoq_bj_100_01 |
PAY OFF QUOTE FILE CREATION |
No |
Yes |
No |
Common |
This process generates the payoff quote letter for the requested accounts. |
ODD |
Customer Service Letter |
olswel_bj_100_01 |
WELCOME LETTER FILE CREATION |
No |
Yes |
No |
Common |
This process generates the welcome letter for the newly funded accounts. |
ODD |
Producer Statement Dump File |
opsprc_bj_100_01 |
DEALER STATEMENTS GENERATION |
No |
Yes |
No |
Common |
This process generates the dealer/producer statements at the specified frequency. |
ODD |
Customer Statement Dump File |
ostprc_bj_100_01 |
CUSTOMER STATEMENTS GENERATION |
No |
Yes |
No |
Common |
This process generates the customer statement for eligible accounts. |
PRQ |
Payable Requistion Customer |
pcuprc_bj_100_01 |
CUSTOMER REFUND PAYMENT REQUISITIONS |
No |
Yes |
No |
Common |
This process creates requisitions for customer overpayment refunds. |
PRQ |
Payable Requisition Producer |
ppores_bj_100_01 |
MONTH END DEALER RESERVE PAYMENT REQUISITIONS |
No |
Yes |
No |
Common |
This process creates requisitions for dealer compensation payments on month-end. |
PRQ |
Payable Requisition Vendor |
pvnprc_bj_100_01 |
VENDOR INVOICE PAYMENT REQUISITIONS |
No |
Yes |
No |
Common |
This process creates requisitions for vendor invoice payments |
PUR |
Archive Accounts |
pacarc_bj_100_01 |
ARCHIVE ACCOUNT DATA TO OTABLES |
No |
Yes |
Yes |
Common |
This process archives account data from ACCOUNTS table to OACCOUNTS table. |
PUR |
Archive Accounts |
pacarc_bj_100_02 |
ARCHIVE ACCOUNT DATA TO OOTABLES |
No |
Yes |
Yes |
Common |
This process archives account data from OACCOUNTS table to OOACCOUNTS table. |
PUR |
Archive Applications |
paparc_bj_100_01 |
ARCHIVE APPLICATION DATA TO OTABLES |
Yes |
No |
No |
Common |
This process archives application-related data from APPLICATIONS to OAPPLICATIONS table. |
PUR |
Archive Applications |
paparc_bj_100_02 |
ARCHIVE APPLICATION DATA TO OOTABLES |
Yes |
No |
No |
Common |
This process archives application-related data from OAPPLICATIONS to OOAPPLICATIONS table. |
PUR |
Archive GL |
pglarc_bj_100_01 |
ARCHIVE GL DATA TO OTABLES |
No |
Yes |
Yes |
Common |
This process archives General Ledger data from GL tables to OGL tables. |
PUR |
Archive GL |
pglarc_bj_100_02 |
ARCHIVE GL DATA TO OOTABLES |
No |
Yes |
Yes |
Common |
This process archives General Ledger data from OGL tables to OOGL tables. |
PUR |
Purge Job Requests |
pjrjrq_bj_100_01 |
Purge Job Requests |
Yes |
Yes |
Yes |
Common |
This process purges job requests from the system. |
PUR |
Purge Output Data Dump |
pododh_bj_100_01 |
PURGE OUTPUT DATA HEADERS |
No |
Yes |
Yes |
Common |
This process purges Output Data Headers from the system. |
PUR |
Archive Securitization |
ppaarc_bj_100_01 |
ARCHIVE POOL DATA TO OTABLES |
No |
Yes |
No |
Common |
This process archives securitization data from TABLE to corresponding OTABLE. |
PUR |
Archive Securitization |
ppaarc_bj_100_02 |
ARCHIVE POOL DATA TO OOTABLES |
No |
Yes |
No |
Common |
This process archives securitization data from OTABLE to corresponding OOTABLE. |
PUR |
Archive Producers |
pprarc_bj_100_01 |
ARCHIVE PRODUCER DATA TO OTABLES |
Yes |
Yes |
Yes |
Common |
This process archives producer data from PRODUCERS table to OPRODUCERS table. |
PUR |
Archive Producers |
pprarc_bj_100_02 |
ARCHIVE PRODUCER DATA TO OOTABLES |
Yes |
Yes |
Yes |
Common |
This process archives producer data from OPRODUCERS table to OOPRODUCERS table. |
PUR |
Archive Producers Txns |
ppxarc_bj_100_01 |
ARCHIVE PRODUCER TXNS DATA TO OTABLES |
No |
Yes |
No |
Common |
This process archives producer transaction data from PRODUCERS table to OPRODUCERS table. |
PUR |
Archive Producers Txns |
ppxarc_bj_100_02 |
ARCHIVE PRODUCER TXNS DATA TO OOTABLES |
No |
Yes |
No |
Common |
This process archives producer transaction data from OPRODUCERS table to OOPRODUCERS table. |
PUR |
Archive Statements |
pstarc_bj_100_01 |
ARCHIVE ACCOUNT STATEMENT AND TXNS DATA TO OTABLES |
No |
Yes |
No |
Common |
This process archives account statement and transaction data from TABLE to corresponding OTABLE. |
PUR |
Archive Statements |
pstarc_bj_100_02 |
ARCHIVE ACCOUNT STATEMENT AND TXNS DATA TO OOTABLES |
No |
Yes |
No |
Common |
This process archives account statement and transaction data from OTABLE to OOTABLE. |
PUR |
Terminate User |
ptuusr_bj_100_01 |
Terminate User |
Yes |
Yes |
Yes |
Common |
This process terminates user satisfying the selection criteria. |
PUR |
Archive Txns (To O tables) |
ptxarc_bj_100_01 |
ARCHIVE TXNS DATA TO OTABLES |
No |
Yes |
No |
Common |
This process archives data from TXNS table to OTXNS table. |
PUR |
Archive Txns (To OO tables) |
ptxarc_bj_100_02 |
ARCHIVE TXNS DATA TO OOTABLES |
No |
Yes |
No |
Common |
This process archives data from OTXNS table to OOTXNS table. |
PUR |
Purge User Logins |
pululg_bj_100_01 |
Purge User Logins |
Yes |
Yes |
Yes |
Common |
This process purges user login data from the system. |
PUR |
Archive Vendor Assignments |
pvaarc_bj_100_01 |
ARCHIVE VENDOR ASSIGNMENTS DATA TO OTABLES |
No |
Yes |
Yes |
Common |
This process archives vendor assignment data from TABLE to OTABLE. |
PUR |
Archive Vendor Assignments |
pvaarc_bj_100_02 |
ARCHIVE VENDOR ASSIGNMENTS DATA TO OOTABLES |
No |
Yes |
Yes |
Common |
This process archives vendor assignment data from OTABLE to OOTABLE. |
PUR |
Archive Vendor Invoices |
pviarc_bj_100_01 |
ARCHIVE VENDOR INVOICES DATA TO OTABLES |
No |
Yes |
Yes |
Common |
This process archives vendor invoice data from TABLEs to OTABLEs. |
PUR |
Archive Vendor Invoices |
pviarc_bj_100_02 |
ARCHIVE VENDOR INVOICES DATA TO OOTABLES |
No |
Yes |
Yes |
Common |
This process archives vendor invoice data from OTABLEs to OOTABLEs. |
QUE |
Queue Customer Service |
qcsprc_bj_100_01 |
CUSTOMER SERVICE QUEUE PROCESSING |
No |
Yes |
Yes |
Common |
This process creates the customer service/collections queues |
RDB1 |
RDB1 Accounts |
racdmp_bj_100_01 |
Data Dump Accounts |
No |
Yes |
Yes |
Common |
This process transfers the account data from (OLTP) Regular tables to Temporary T tables |
RDB1 |
RDB1 Applications |
rapdmp_bj_100_01 |
LOAD APPLICATION RELATED DATA INTO T TABLES |
Yes |
No |
No |
Common |
This process transfers the application data from (OLTP) Regular tables to Temporary T tables |
RDB1 |
RDB1 Asset Tracking |
ratdmp_bj_100_01 |
LOAD ASSET RELATED DATA INTO T TABLES |
No |
Yes |
No |
Common |
This process transfers the account asset data from (OLTP) Regular tables to Temporary T tables |
RDB1 |
RDB1 Bankruptcy |
rbkdmp_bj_100_01 |
LOAD BANKRUPTCY DATA TO T TABLES |
No |
No |
Yes |
Common |
This process transfers the account bankruptcy data from (OLTP) Regular tables to Temporary T tables |
RDB1 |
RDB1 Call Activities |
rcadmp_bj_100_01 |
LOAD CALL ACTIVITIES DATA INTO T TABLES |
No |
No |
Yes |
Common |
This process transfers the account call activity data from (OLTP) Regular tables to Temporary T tables |
RDB1 |
RDB1 Deficiency |
rchdmp_bj_100_01 |
LOAD DEFICIENCY DATA INTO T TABLES |
No |
No |
Yes |
Common |
This process transfers the account deficiency data from (OLTP) Regular tables to Temporary T tables |
RDB1 |
RDB1 Contracts |
rcodmp_bj_100_01 |
LOAD CONTRACT DATA INTO T TABLES |
Yes |
Yes |
No |
Common |
This process transfers the account contracts data from (OLTP) Regular tables to Temporary T tables |
RDB1 |
RDB1 Repossessions |
rfodmp_bj_100_01 |
LOAD REPO FORECLOSURE DATA INTO T TABLES |
No |
No |
Yes |
Common |
This process transfers the account bankruptcy data from (OLTP) Regular tables to Temporary T tables |
RDB1 |
RDB1 Producers |
rprdmp_bj_100_01 |
LOAD PRODUCER AND ITS TXNS DATA INTO T TABLES |
No |
Yes |
No |
Common |
This process transfers the producer and producer transactions data from (OLTP) Regular tables to Temporary T tables |
RDB1 |
RDB1 Setup |
rstdmp_bj_100_01 |
LOAD SETUP RELATED DATA INTO T TABLES |
Yes |
Yes |
Yes |
Common |
This process transfers the setup data from (OLTP) Regular tables to Temporary T tables |
RDB1 |
RDB1 Txns |
rtxdmp_bj_100_01 |
LOAD TXN DATA INTO T TABLES |
No |
Yes |
No |
Common |
This process transfers the account transactions data from (OLTP) Regular tables to Temporary T tables |
RDB2 |
RDB2 Accounts |
racacc_bj_100_01 |
Load Reporting Tables Accounts |
No |
Yes |
Yes |
Common |
This process transfers the account data from T tables to RDB tables |
RDB2 |
RDB2 Accounts (Derived Fields) |
racdrv_bj_100_01 |
Update Reporting Tables Accounts |
No |
Yes |
Yes |
Common |
This process updates the codes with description for account RDB tables |
RDB2 |
RDB2 Applications |
rapapp_bj_100_01 |
Load Reporting Tables Applications |
Yes |
No |
No |
Common |
This process transfers the application data from T tables to RDB tables |
RDB2 |
RDB2 Applications (Derived Fields) |
rapdrv_bj_100_01 |
Update Reporting Tables Applications (Derived Fields) |
Yes |
No |
No |
Common |
This process updates the codes with description for application RDB tables |
RDB2 |
RDB2 Asset Tracking |
ratase_bj_100_01 |
Load Reporting Tables Asset Tracking |
No |
Yes |
No |
Common |
This process transfers the account asset tracking data from T tables to RDB tables |
RDB2 |
RDB2 Asset Tracking (Derived Fields) |
ratdrv_bj_100_01 |
Update Reporting Tables Asset Tracking (Derived Fields) |
No |
Yes |
No |
Common |
This process updates the codes with description for account asset tracking RDB tables |
RDB2 |
RDB2 Bankruptcy |
rbkabd_bj_100_01 |
Load Reporting Tables Bankruptcy |
No |
No |
Yes |
Common |
This process transfers the account bankruptcy data from T tables to RDB tables |
RDB2 |
RDB2 Call Activities |
rcacac_bj_100_01 |
Load Reporting Tables Call Activities |
No |
No |
Yes |
Common |
This process transfers the account call activities data from T tables to RDB tables |
RDB2 |
RDB2 Deficiency |
rchaof_bj_100_01 |
Load Reporting Tables Deficiency |
No |
No |
Yes |
Common |
This process transfers the account deficiency data from T tables to RDB tables |
RDB2 |
RDB2 Contracts |
rcocon_bj_100_01 |
Load Reporting Tables Contracts |
Yes |
Yes |
No |
Common |
This process transfers the account contract data from T tables to RDB tables |
RDB2 |
RDB2 Contracts (Derived Fields) |
rcodrv_bj_100_01 |
Update Reporting Tables Contracts (Derived Fields) |
Yes |
Yes |
No |
Common |
This process updates the codes with description for account contract RDB tables |
RDB2 |
RDB2 Repossessions |
rfoafr_bj_100_01 |
Load Reporting Tables Repossessions |
No |
No |
Yes |
Common |
This process transfers the account repossession data from T tables to RDB tables |
RDB2 |
RDB2 Producers (Derived Fields) |
rprdrv_bj_100_01 |
Update Reporting Tables Producers (Derived Fields) |
No |
Yes |
No |
Common |
This process updates the codes with description for producer and producer transactions RDB tables |
RDB2 |
RDB2 Producers |
rprpro_bj_100_01 |
Load Reporting Tables Producers |
No |
Yes |
No |
Common |
This process transfers the producer and producer transactions data from T tables to RDB tables |
RDB2 |
RDB2 Setup |
rststp_bj_100_01 |
Load Reporting Tables Setup |
Yes |
Yes |
Yes |
Common |
This process transfers the setup data from T tables to RDB tables |
RDB2 |
RDB2 Txns |
rtxdrv_bj_100_01 |
Load Reporting Tables Txns |
No |
Yes |
Yes |
Common |
This process transfers the account transaction data from T tables to RDB tables |
RDB2 |
RDB2 Txns (Derived Fields) |
rtxtxn_bj_100_01 |
Update Reporting Tables Txns (Derived Fields) |
No |
Yes |
Yes |
Common |
This process updates the codes with description for account transactions RDB tables |
RED |
Policy Creation Batch Job |
redprc_bj_100_01 |
Policy creation for PII Data |
Yes |
Yes |
Yes |
Common |
This process creates data redaction policy for masking personal identifiable information in UI. |
SEC |
Pool Summary |
ssmprc_bj_100_01 |
POOL SUMMARY TABLE POPULATION |
No |
Yes |
No |
Common |
This process populates summary tables for all pools |
SET-OVR |
OVERPAYMENT REALLOCATIONS |
PFSTXNOVR_BJ_100_01 |
OVERPAYMENT REALLOCATIONS |
No |
Yes |
No |
Common |
This process handles the overpayments/overages existing on an account |
TPE |
Earning/Amortization |
tamprc_bj_100_01 |
AMORTIZATION TRANSACTIONS PROCESSING |
No |
Yes |
No |
Common |
This process creates the month-end interest accrual transactions on month-end. |
TPE |
Earning/Amortization |
tamprc_bj_111_01 |
MONTH END AMORTIZATION TRANSACTIONS |
No |
Yes |
No |
Loan |
This process creates the month-end interest accrual transactions on month-end. |
TPE |
Escrow Non Monetary Transactions |
tenbmt_bj_100_01 |
Escrow Non Monetary Batch Transactions |
No |
Yes |
Yes |
Common |
This process posts escrow non monetary transactions in the background at the specified time interval. |
TPE |
Escrow Analysis & Disbursements |
tesanl_bj_100_01 |
Escrow Analysis Posting |
No |
Yes |
No |
Common |
This process posts all approved escrow analysis to the account |
TPE |
Escrow Analysis & Disbursements |
tesanl_bj_100_02 |
Create batches for Customer Refund Requests |
No |
Yes |
No |
Common |
This process creates company branch wise batches for customer refund requests. |
TPE |
Escrow Analysis & Disbursements |
tesanl_bj_100_03 |
Create Transaction of Customer Refund Requests |
No |
Yes |
No |
Common |
This process populate customer refund request in respective batch created above |
TPE |
Escrow Analysis & Disbursements |
tesanl_bj_100_04 |
Compute control totals for customer refund request batches |
No |
Yes |
No |
Common |
This process populates control totals for the bathes created for customer refund requests. |
TPE |
Escrow Analysis & Disbursements |
tesanl_bj_100_05 |
Escrow compliance checking |
No |
Yes |
No |
Common |
This process checks escrowable account for compliance |
TPE |
Escrow Analysis & Disbursements |
tesdsb_bj_100_05 |
Escrow disbursement posting & requisition creation |
No |
Yes |
No |
Common |
This process posts processed escrow disbursement and creates requisitions. |
TPE |
Non Monetary Transactions |
tnmbmt_bj_100_01 |
NON MONETARY TRANSACTIONS POSTING |
No |
Yes |
Yes |
Common |
This process posts non monetary transactions in the background at the specified time interval. |
TPE |
Compensation |
tprcom_bj_111_01 |
Compensation |
No |
Yes |
No |
Loan |
This process creates transaction for month-end producer compensation |
TPE |
Statement |
tprpsg_bj_111_01 |
Producer Statement |
No |
Yes |
No |
Loan |
This process creates the month-end interest accrual transactions on month-end. |
TPE |
Monetary Transactions |
txnacr_bj_100_01 |
INTEREST ACCRUAL AND DELINQUENCY PROCESSING |
No |
Yes |
No |
Common |
This process posts any payment batches open in the system. This process can be set to run periodically. |
TPE |
Monetary Transactions |
txnact_bj_100_01 |
ACCOUNT ACTIVATION |
No |
Yes |
No |
Common |
This job activates new accounts i.e. changes status from PENDING to ACTIVE. |
TPE |
Monetary Transactions |
txnadv_bj_112_01 |
Advance Posting |
No |
Yes |
No |
Line |
This process posts any advance batches open in the system. This process can be set to run periodically. |
TPE |
Monetary Transactions |
txnann_bj_100_01 |
ANNIVERSARY PROCESSING |
No |
Yes |
No |
Common |
This process carries out the anniversary processing for eligible accounts |
TPE |
Monetary Transactions |
txnbmt_bj_100_01 |
MONETARY TRANSACTIONS POSTING |
No |
Yes |
No |
Common |
This process posts monetary transactions in the background at the specified time interval. |
TPE |
Monetary Transactions |
txnchg_bj_100_01 |
Chargeoff Processing |
No |
Yes |
No |
Common |
This process charges off eligible or scheduled for chargeoff accounts . |
TPE |
Monetary Transactions |
txncls_bj_100_01 |
VOID/PAID ACCOUNT CLOSE PROCESSING |
No |
Yes |
No |
Common |
This process closes void and paid off accounts. |
TPE |
Monetary Transactions |
txnddt_bj_100_01 |
BILLING/DUE DATES PROCESSING |
No |
Yes |
No |
Common |
This process creates/updates the due dates for the accounts in the system. |
TPE |
Monetary Transactions |
txnfpd_bj_100_01 |
FIRST PMT DEDUCTION PROCESSING |
No |
Yes |
No |
Common |
This process posts the first payment deduction payment to the eligible accounts. |
TPE |
Monetary Transactions |
txnfpr_bj_111_01 |
FIRST PMT REFUND PROCESSING |
No |
Yes |
No |
Loan |
This process posts the first payment deduction payment to the eligible accounts. |
TPE |
Monetary Transactions |
txnltc_bj_100_01 |
LATE CHARGE PROCESSING |
No |
Yes |
No |
Common |
This process assesses late charge depending on the rules, for all accounts in the system. |
TPE |
Monetary Transactions |
txnmtd_bj_100_01 |
MONTH END PROCESSING |
No |
Yes |
No |
Common |
This process populates the month end balances and carries over the balances to next month. |
TPE |
Monetary Transactions |
txnpmt_bj_100_01 |
Payment Posting |
No |
Yes |
No |
Common |
This process does the daily accrual and delinquency processing. |
TPE |
Monetary Transactions |
txnprm_bj_100_01 |
PROMOTION END PROCESSING |
No |
Yes |
No |
Common |
This process 'ends' the promotion on the account. |
TPE |
Monetary Transactions |
txnprm_bj_100_03 |
TLP PROMOTION CANCEL PROCESSING |
No |
Yes |
No |
Common |
This process 'cancels' the promotion on the account. |
TPE |
Monetary Transactions |
txnrat_bj_100_01 |
RATE CHANGE PROCESSING |
No |
Yes |
No |
Common |
This process changes the prevalent rate on an account. |
TPE |
Monetary Transactions |
txnsch_bj_100_01 |
SCHEDULE FOR CHARGEDOFF PROCESSING |
No |
Yes |
No |
Common |
This process puts the 'Schedule for Charge Off' condition on eligible accounts. |
TPE |
Monetary Transactions |
txntip_bj_100_01 |
TERMINATION PROCESSING |
No |
Yes |
No |
Common |
This process puts the "Paid" status on eligible accounts |
TPE |
Monetary Transactions |
txnytd_bj_100_01 |
YEAR END PROCESSING |
No |
Yes |
No |
Common |
This process populates the year end balances and carries over the balances to next year. |
LTR |
CONDITIONAL ADVERSE ACTION LETTER |
LORACO_BJ_100_01 |
CONDITIONAL ADVERSE ACTION LETTER GENERATION |
Yes |
No |
No |
Loan |
This process generates the adverse action letter for relevant applications. |
LTR |
ADVERSE ACTION LETTER |
LORADV_BJ_100_01 |
ADVERSE ACTION LETTER GENERATION |
Yes |
No |
No |
Loan |
This process generates the adverse action letter for relevant applications. |
RPT |
ACCOUNT LIST |
ROPACC_EM_100_01 |
ACCOUNT LIST |
No |
Yes |
No |
Common |
|
RPT |
ADVANCE POSTING LIST |
ROPADV_EM_100_01 |
ADVANCE POSTING LIST |
No |
Yes |
No |
Common |
|
RPT |
ASSET TRACKING DETAILS |
ROPATK_EM_100_01 |
ASSET TRACKING DETAILS |
No |
Yes |
No |
Common |
|
RPT |
BANKRUPTCY ACCOUNT LIST |
ROPBNK_EM_100_01 |
BANKRUPTCY ACCOUNT LIST |
No |
Yes |
No |
Common |
|
RPT |
COLLECTOR ACTIVITY DETAILS |
ROPCOL_EM_100_01 |
COLLECTOR ACTIVITY DETAILS |
No |
Yes |
No |
Common |
|
RPT |
DEFICIENCY ACCOUNT LIST |
ROPDEF_EM_100_01 |
DEFICIENCY ACCOUNT LIST |
No |
Yes |
No |
Common |
|
RPT |
DELINQUENT ACCOUNT LIST |
ROPDLQ_EM_100_01 |
DELINQUENT ACCOUNT LIST |
No |
Yes |
No |
Common |
|
RPT |
FUNDING CONTRACT LIST |
ROPFUN_EM_100_01 |
FUNDING CONTRACT LIST |
No |
Yes |
No |
Common |
|
RPT |
GL TXN DETAILS LIST |
ROPGLI_EM_100_01 |
GL TXN DETAILS LIST |
No |
Yes |
No |
Common |
|
RPT |
APPLICATIONS LIST |
ROPORG_EM_100_01 |
APPLICATIONS LIST |
No |
Yes |
No |
Common |
|
RPT |
PAYMENT ALLOCATION POSTING DETAILS| |
ROPPAL_EM_100_01 |
PAYMENT ALLOCATION POSTING DETAILS| |
No |
Yes |
No |
Common |
|
RPT |
PAYMENT POSTING LIST |
ROPPMT_EM_100_01 |
PAYMENT POSTING LIST |
No |
Yes |
No |
Common |
|
RPT |
PAYABLE REQUISITION LIST |
ROPPRQ_EM_100_01 |
PAYABLE REQUISITION LIST |
No |
Yes |
No |
Common |
|
RPT |
REPOSSSESION/FORECLOSURE ACCOUNT LIST |
ROPREP_EM_100_01 |
REPOSSSESION/FORECLOSURE ACCOUNT LIST |
No |
Yes |
No |
Common |
|
RPT |
SCHEDULE TO CHARGEOFF LIST |
ROPSCH_EM_100_01 |
SCHEDULE TO CHARGEOFF LIST |
No |
Yes |
No |
Common |
|
RPT |
TERMINATION IN PROGRESS LIST |
ROPTIP_EM_100_01 |
TERMINATION IN PROGRESS LIST |
No |
Yes |
No |
Common |
|
RPT |
NON MONTETARY TXN POSTING LIST |
ROPTNM_EM_100_01| |
NON MONTETARY TXN POSTING LIST |
No |
Yes |
No |
Common |
|
RPT |
MONTETARY TXN POSTING LIST |
ROPTXN_EM_100_01 |
MONTETARY TXN POSTING LIST |
No |
Yes |
No |
Common |
|
RPT |
BATCH JOB SETUP |
CMNBJB_EM_100_01 |
BATCH JOB SETUP |
No |
Yes |
No |
Common |
|
RPT |
BATCH JOB LOG |
CMNBJB_EM_100_02 |
BATCH JOB LOG |
No |
Yes |
No |
Common |
|
RPT |
NUMBER OF CREDIT APPLICATIONS ENTERED BY USER |
OUNADE_EM_100_01 |
NUMBER OF CREDIT APPLICATIONS ENTERED BY USER |
No |
Yes |
No |
Common |
|
RPT |
CREDIT APPLICATIONS IMAGES BY STATUS |
OUNADE_EM_100_02 |
CREDIT APPLICATIONS IMAGES BY STATUS |
No |
Yes |
No |
Common |
|
RPT |
UNDERWRITING STATUS BY MONTH AND PRODUCER (LOAN) |
OUNUND_EM_111_11 |
UNDERWRITING STATUS BY MONTH AND PRODUCER (LOAN) |
No |
Yes |
No |
Common |
|
RPT |
UNDERWRITING STATUS BY MONTH AND UNDERWRITER (LOAN) |
OUNUND_EM_111_12 |
UNDERWRITING STATUS BY MONTH AND UNDERWRITER (LOAN) |
No |
Yes |
No |
Common |
|
RPT |
UNDERWRITING STATUS BY MONTH (LOAN) |
OUNUND_EM_111_13 |
UNDERWRITING STATUS BY MONTH (LOAN) |
No |
Yes |
No |
Common |
|
RPT |
UNDERWRITING STATUS BY UNDERWRITER (LOAN) |
OUNUND_EM_111_14 |
UNDERWRITING STATUS BY UNDERWRITER (LOAN) |
No |
Yes |
No |
Common |
|
RPT |
UNDERWRITING STATUS BY MONTH AND PRODUCER (LINE) |
OUNUND_EM_112_11 |
UNDERWRITING STATUS BY MONTH AND PRODUCER (LINE) |
No |
Yes |
No |
Common |
|
RPT |
UNDERWRITING STATUS BY MONTH AND UNDERWRITER (LINE) |
OUNUND_EM_112_12 |
UNDERWRITING STATUS BY MONTH AND UNDERWRITER (LINE) |
No |
Yes |
No |
Common |
|
RPT |
UNDERWRITING STATUS BY MONTH (LINE) |
OUNUND_EM_112_13 |
UNDERWRITING STATUS BY MONTH (LINE) |
No |
Yes |
No |
Common |
|
RPT |
UNDERWRITING STATUS BY UNDERWRITER (LINE) |
OUNUND_EM_112_14 |
UNDERWRITING STATUS BY UNDERWRITER (LINE) |
No |
Yes |
No |
Common |
|
RPT |
UNDERWRITING STATUS BY MONTH AND PRODUCER (LEASE) |
OUNUND_EM_121_11 |
UNDERWRITING STATUS BY MONTH AND PRODUCER (LEASE) |
No |
Yes |
No |
Common |
|
RPT |
UNDERWRITING STATUS BY MONTH AND UNDERWRITER (LEASE) |
OUNUND_EM_121_12 |
UNDERWRITING STATUS BY MONTH AND UNDERWRITER (LEASE) |
No |
Yes |
No |
Common |
|
RPT |
UNDERWRITING STATUS BY MONTH (LEASE) |
OUNUND_EM_121_13 |
UNDERWRITING STATUS BY MONTH (LEASE) |
No |
Yes |
No |
Common |
|
RPT |
UNDERWRITING STATUS BY UNDERWRITER (LOAN) |
OUNUND_EM_121_14 |
UNDERWRITING STATUS BY UNDERWRITER (LOAN) |
Yes |
No |
No |
Lease |
|
RPT |
ACCOUNT PAYABLE (ORIGINATION) |
OFNAPY_EM_100_01 |
ACCOUNT PAYABLE (ORIGINATION) |
Yes |
No |
No |
Common |
|
RPT |
ACCOUNT PAYABLE (SERVICING) |
OFNAPY_EM_100_02 |
ACCOUNT PAYABLE (SERVICING) |
No |
Yes |
No |
Common |
|
RPT |
PRE-FUNDING CONTRACTS (LOAN) |
OFNFND_EM_111_01 |
PRE-FUNDING CONTRACTS (LOAN) |
Yes |
No |
No |
Loan |
|
RPT |
FUNDED CONTRACTS (LOAN) |
OFNFND_EM_111_02 |
FUNDED CONTRACTS (LOAN) |
Yes |
No |
No |
loan |
|
RPT |
PRE-FUNDING CONTRACTS (LINE) |
OFNFND_EM_112_01 |
PRE-FUNDING CONTRACTS (LINE) |
Yes |
No |
No |
Loan |
|
RPT |
FUNDED CONTRACTS (LINE) |
OFNFND_EM_112_02 |
FUNDED CONTRACTS (LINE) |
Yes |
No |
No |
Common |
|
RPT |
PRE-FUNDING CONTRACTS (LEASE) |
OFNFND_EM_121_01 |
PRE-FUNDING CONTRACTS (LEASE) |
Yes |
No |
No |
Common |
|
RPT |
FUNDED CONTRACTS (LEASE) |
OFNFND_EM_121_02 |
FUNDED CONTRACTS (LEASE) |
Yes |
No |
No |
Loan |
|
RPT |
ACCOUNT PAYABLE LOG BY PRODUCER |
OCSAPP_EM_100_01 |
ACCOUNT PAYABLE LOG BY PRODUCER |
Yes |
No |
No |
Loan |
|
RPT |
ACCOUNT PAYABLE LOG BY VENDOR |
OCSAPV_EM_100_01 |
ACCOUNT PAYABLE LOG BY VENDOR |
Yes |
No |
No |
Loan |
|
RPT |
COLLATERAL TRACKING LOG |
OCSAST_EM_100_01 |
COLLATERAL TRACKING LOG |
Yes |
No |
No |
Common |
|
RPT |
GL POSTING LOG |
OCSGLI_EM_100_01 |
GL POSTING LOG |
Yes |
No |
No |
Common |
|
RPT |
PAYMENT POSTING (DAILY CASH) LOG |
OCSPMT_EM_100_01 |
PAYMENT POSTING (DAILY CASH) LOG |
Yes |
No |
No |
Common |
|
RPT |
PAYMENT POSTING ERROR LOG |
OCSPMT_EM_100_02 |
PAYMENT POSTING ERROR LOG |
Yes |
No |
No |
Common |
|
RPT |
ACCOUNT LISTING (LOAN) |
OCSACC_EM_111_01 |
ACCOUNT LISTING (LOAN) |
Yes |
No |
No |
Loan |
|
RPT |
EXCESS PAYMENT (REFUND) LOG (LOAN) |
OCSPMT_EM_111_03 |
EXCESS PAYMENT (REFUND) LOG (LOAN) |
Yes |
No |
No |
Loan |
|
RPT |
PAYMENT HISTORY (LOAN) |
OCSPMT_EM_111_04 |
PAYMENT HISTORY (LOAN) |
Yes |
No |
No |
Loan |
|
RPT |
PAYMENT ALLOCATIONS LOG (LOAN) |
OCSPMT_EM_111_05 |
PAYMENT ALLOCATIONS LOG (LOAN) |
Yes |
No |
No |
Loan |
|
RPT |
PAYMENT ALLOCATIONS LOG BY GL POST DT (LOAN) |
OCSPMT_EM_111_06 |
PAYMENT ALLOCATIONS LOG BY GL POST DT (LOAN) |
Yes |
No |
No |
Loan |
|
RPT |
PRODUCER STATEMENT (LOAN) |
OCSPSM_EM_111_01 |
PRODUCER STATEMENT (LOAN) |
Yes |
No |
No |
Loan |
|
RPT |
PRODUCER MONETARY TXNS LOG BY GL POST DT (LOAN) |
OCSPTX_EM_111_01 |
PRODUCER MONETARY TXNS LOG BY GL POST DT (LOAN) |
Yes |
No |
No |
Loan |
|
RPT |
SCHEDULED FOR CHARGEOFF ACCOUNTS LOG (LOAN) |
OCSSCH_EM_111_01 |
SCHEDULED FOR CHARGEOFF ACCOUNTS LOG (LOAN) |
Yes |
No |
No |
Loan |
|
RPT |
AMORTIZED TXNS LOG BY GL POST DT (LOAN) |
OCSTAM_EM_111_01 |
AMORTIZED TXNS LOG BY GL POST DT (LOAN) |
Yes |
No |
No |
Loan |
|
RPT |
SCHEDULED FOR TERMINATION ACCOUNTS LOG (LOAN) |
OCSTER_EM_111_01 |
SCHEDULED FOR TERMINATION ACCOUNTS LOG (LOAN) |
Yes |
No |
No |
Loan |
|
RPT |
MONETARY TXNS LOG BY GL POST DT (LOAN) |
OCSTXN_EM_111_01 |
MONETARY TXNS LOG BY GL POST DT (LOAN) |
Yes |
No |
No |
Loan |
|
RPT |
ACCOUNT LISTING (LINE) |
OCSACC_EM_112_01 |
ACCOUNT LISTING (LINE) |
Yes |
No |
No |
Loan |
|
RPT |
ADVANCE POSTING LOG (LINE) |
OCSADV_EM_112_01 |
ADVANCE POSTING LOG (LINE) |
Yes |
No |
No |
Loan |
|
RPT |
ADVANCE POSTING ERROR LOG (LINE) |
OCSADV_EM_112_02 |
ADVANCE POSTING ERROR LOG (LINE) |
Yes |
No |
No |
Loan |
|
RPT |
PAYMENT HISTORY (LINE) |
OCSPMT_EM_112_04 |
PAYMENT HISTORY (LINE) |
Yes |
No |
No |
Loan |
|
RPT |
PAYMENT ALLOCATIONS LOG (LINE) |
OCSPMT_EM_112_05 |
PAYMENT ALLOCATIONS LOG (LINE) |
Yes |
No |
No |
Common |
|
RPT |
PAYMENT ALLOCATIONS LOG BY GL POST DT (LINE) |
OCSPMT_EM_112_06 |
PAYMENT ALLOCATIONS LOG BY GL POST DT (LINE) |
Yes |
No |
No |
Common |
|
RPT |
SCHEDULED FOR CHARGEOFF ACCOUNTS LOG (LINE) |
OCSSCH_EM_112_01 |
SCHEDULED FOR CHARGEOFF ACCOUNTS LOG (LINE) |
Yes |
No |
No |
Common |
|
RPT |
AMORTIZED TXNS LOG BY GL POST DT (LINE) |
OCSTAM_EM_112_01 |
AMORTIZED TXNS LOG BY GL POST DT (LINE) |
Yes |
No |
No |
Common |
|
RPT |
SCHEDULED FOR TERMINATION ACCOUNTS LOG (LINE) |
OCSTER_EM_112_01 |
SCHEDULED FOR TERMINATION ACCOUNTS LOG (LINE) |
Yes |
No |
No |
Common |
|
RPT |
MONETARY TXNS LOG BY GL POST DT (LINE) |
OCSTXN_EM_112_01 |
MONETARY TXNS LOG BY GL POST DT (LINE) |
Yes |
No |
No |
Common |
|
RPT |
ACCOUNT LISTING (LEASE) |
OCSACC_EM_121_01 |
ACCOUNT LISTING (LEASE) |
Yes |
No |
No |
Common |
|
RPT |
PAYMENT HISTORY (LEASE) |
OCSPMT_EM_121_04 |
PAYMENT HISTORY (LEASE) |
Yes |
No |
No |
Common |
|
RPT |
PAYMENT ALLOCATIONS LOG (LEASE) |
OCSPMT_EM_121_05 |
PAYMENT ALLOCATIONS LOG (LEASE) |
Yes |
No |
No |
Common |
|
RPT |
PAYMENT ALLOCATIONS LOG BY GL POST DT (LEASE) |
OCSPMT_EM_121_06 |
PAYMENT ALLOCATIONS LOG BY GL POST DT (LEASE) |
Yes |
No |
No |
Common |
|
RPT |
SCHEDULED FOR CHARGEOFF ACCOUNTS LOG (LEASE) |
OCSSCH_EM_121_01 |
SCHEDULED FOR CHARGEOFF ACCOUNTS LOG (LEASE) |
Yes |
No |
No |
Common |
|
RPT |
AMORTIZED TXNS LOG BY GL POST DT (LEASE) |
OCSTAM_EM_121_01 |
AMORTIZED TXNS LOG BY GL POST DT (LEASE) |
Yes |
No |
No |
Common |
|
RPT |
SCHEDULED FOR TERMINATION ACCOUNTS LOG (LEASE) |
OCSTER_EM_121_01 |
SCHEDULED FOR TERMINATION ACCOUNTS LOG (LEASE) |
Yes |
No |
No |
Common |
|
RPT |
MONETARY TXNS LOG BY GL POST DT (LEASE) |
OCSTXN_EM_121_01 |
MONETARY TXNS LOG BY GL POST DT (LEASE) |
Yes |
No |
No |
Common |
|
RPT |
BANKRUPTCY LOG |
OCOBNK_EM_100_01 |
BANKRUPTCY LOG |
Yes |
No |
No |
Common |
|
RPT |
COLLECTOR ACTIVITY (DETAILED) LOG |
OCOCOL_EM_100_01 |
COLLECTOR ACTIVITY (DETAILED) LOG |
No |
No |
Yes |
Common |
|
RPT |
COLLECTOR PRODUCTIVITY BY QUEUE |
OCOCOL_EM_100_02 |
COLLECTOR PRODUCTIVITY BY QUEUE |
No |
No |
Yes |
Common |
|
RPT |
DELINQUENCY ANALYSIS BY PRODUCER |
OCOCOL_EM_100_03 |
DELINQUENCY ANALYSIS BY PRODUCER |
No |
No |
Yes |
Common |
|
RPT |
DELINQUENCY ANALYSIS BY CREDIT GRADE |
OCOCOL_EM_100_04 |
DELINQUENCY ANALYSIS BY CREDIT GRADE |
No |
No |
Yes |
Common |
|
RPT |
DELINQUENCY ANALYSIS BY STATE |
OCOCOL_EM_100_05 |
DELINQUENCY ANALYSIS BY STATE |
No |
No |
Yes |
Common |
|
RPT |
PAYMENT PROMISE LOG |
OCOCOL_EM_100_06 |
PAYMENT PROMISE LOG |
No |
No |
Yes |
Common |
|
RPT |
COLLECTOR ACTIVITY LOG |
OCOCOL_EM_100_07 |
COLLECTOR ACTIVITY LOG |
No |
No |
Yes |
Common |
|
RPT |
DEFICIENCY LOG |
OCODEF_EM_100_01 |
DEFICIENCY LOG |
No |
No |
Yes |
Common |
|
RPT |
DELINQUENCY LOG |
OCODLQ_EM_100_01 |
DELINQUENCY LOG |
No |
No |
Yes |
Common |
|
RPT |
REPOSSESSION/FORECLOSURE LOG |
OCOREP_EM_100_01 |
REPOSSESSION/FORECLOSURE LOG |
No |
No |
Yes |
Common |
|
RPT |
NON MONETARY TXNS LOG |
OCOTNM_EM_100_01 |
NON MONETARY TXNS LOG |
No |
No |
Yes |
Common |
|
RPT |
VENDOR INVOICE LOG |
OCOVIN_EM_100_01 |
VENDOR INVOICE LOG |
No |
No |
Yes |
Common |
|
RPT |
VENDOR WORK ORDER LOG |
OCOVNA_EM_100_01 |
VENDOR WORK ORDER LOG |
No |
No |
Yes |
Common |
|
RPT |
POOL DELINQUENCY SUMMARY (LOAN) |
OCSSEC_EM_111_01 |
POOL DELINQUENCY SUMMARY (LOAN) |
No |
Yes |
No |
Common |
|
RPT |
POOL DEFAULTS (NON LIQUIDATED) (LOAN) |
OCSSEC_EM_111_02 |
POOL DEFAULTS (NON LIQUIDATED) (LOAN) |
No |
Yes |
No |
Common |
|
RPT |
POOL PAYOFFS (LOAN) |
OCSSEC_EM_111_03 |
POOL PAYOFFS (LOAN) |
No |
Yes |
No |
Common |
|
RPT |
POOL RECOVERY (LOAN) |
OCSSEC_EM_111_04 |
POOL RECOVERY (LOAN) |
No |
Yes |
No |
Common |
|
RPT |
POOL DELINQUENCY (LOAN) |
OCSSEC_EM_111_05 |
POOL DELINQUENCY (LOAN) |
No |
Yes |
No |
Common |
|
RPT |
POOL REPURCHASED ACCOUNTS (LOAN) |
OCSSEC_EM_111_06 |
POOL REPURCHASED ACCOUNTS (LOAN) |
No |
Yes |
No |
Common |
|
RPT |
POOL MONTHLY ACTIVITY (LOAN) |
OCSSEC_EM_111_07 |
POOL MONTHLY ACTIVITY (LOAN) |
No |
Yes |
No |
Common |
|
RPT |
POOL LIQUIDATED CONTRACTS (LOAN) |
OCSSEC_EM_111_08 |
POOL LIQUIDATED CONTRACTS (LOAN) |
No |
Yes |
No |
Common |
|
RPT |
POOL TXNS LOG BY GL POST DT (LOAN) |
OCSSEC_EM_111_09 |
POOL TXNS LOG BY GL POST DT (LOAN) |
No |
Yes |
No |
Common |
|
SET-QRT |
Real time Queues processing |
QCSPRC_BJ_100_02 |
Real time Queues processing |
No |
Yes |
Yes |
Common |
This batch job processes queues marked as real time based on refresh frequency setup in the job set. |
TAM |
MONTH END COMPENSATION DISBURSEMENT PROCESSING |
TPRCOM_BJ_100_01 |
MONTH END COMPENSATION DISBURSEMENT PROCESSING |
No |
Yes |
No |
Common |
|
TAM |
PRODUCER STATEMENTS |
TPRPSG_BJ_100_01 |
PRODUCER STATEMENTS |
No |
Yes |
No |
Common |
|
TAM |
PRODUCER STATUS CHANGE |
TPRSTA_BJ_100_01 |
PRODUCER STATUS CHANGE |
No |
Yes |
No |
Common |
|
TPE |
Escrow Analysis & Disbursements |
TXNCHG_BJ_100_02 |
CHARGEOFF PROCESSING FOR ACTIVE ACCOUNTS |
No |
Yes |
No |
Common |
This package contains procedures related to Batch Job for chargeoff processing |
ESC |
ESCROW ANALYSIS POSTING |
TESANL_BJ_100_01 |
ESCROW ANALYSIS POSTING |
No |
Yes |
No |
Common |
This package contains procedures related to Batch Job for escrow analysis processing |
ESC |
CREATE BATCHES FOR CUSTOMER REFUND REQUESTS |
TESANL_BJ_100_02 |
CREATE BATCHES FOR CUSTOMER REFUND REQUESTS |
No |
Yes |
No |
Common |
This package contains procedures related to Batch Job for escrow analysis processing |
ESC |
COMPUTE CONTROLS FOR CUSTOMER REFUND REQUEST BATCHES |
TESANL_BJ_100_04 |
COMPUTE CONTROLS FOR CUSTOMER REFUND REQUEST BATCHES |
No |
Yes |
No |
Common |
|
ESC |
ESCROW COMPLIANCE CHECKING |
TESANL_BJ_100_05 |
ESCROW COMPLIANCE CHECKING |
No |
Yes |
No |
Common |
|
ESC |
CREATE PAYABLE REQUISITIONS FROM APPROVED DISBURSEMENT REQUESTS |
TESDSB_BJ_100_01 |
CREATE PAYABLE REQUISITIONS FROM APPROVED DISBURSEMENT REQUESTS |
No |
Yes |
No |
Common |
|
PUR |
ARCHIVE ACCOUNT DATA TO OTABLES |
PACARC_BJ_100_01 |
ARCHIVE ACCOUNT DATA TO OTABLES |
No |
Yes |
No |
Common |
|
EVE |
BATCH EVENTS FOR ACCOUNTS |
EVBACC_BJ_100_01 |
BATCH EVENTS FOR ACCOUNTS |
|
Yes |
|
|
|
EVE |
BATCH EVENTS FOR APPLICATIONS |
EVBAPP_BJ_100_01 |
BATCH EVENTS FOR APPLICATIONS |
Yes |
|
|
|
|
EVE |
MAIN BATCH JOB FOR BATCH EVENTS PROCESSING |
EVBPRC_BJ_100_01 |
MAIN BATCH JOB FOR BATCH EVENTS PROCESSING |
|
Yes |
|
|
|
ODD2 |
BATCH JOB TO GENERATE METRO 2 DATA |
CBUUTL_BJ_100_02 |
BATCH JOB TO GENERATE METRO 2 DATA |
Yes |
|
|
|
|
ODD2 |
BATCH JOB FOR CREATING METRO 2 DATA FILE |
CBUUTL_BJ_100_03 |
BATCH JOB FOR CREATING METRO 2 DATA FILE |
Yes |
|
|
|
|
ODD2 |
THIRD PARTY ACH PROCESSING |
ACTPRC_BJ_100_01 |
THIRD PARTY ACH PROCESSING |
|
Yes |
|
|
|
ODD2 |
THIRD PARTY OUTPUT DATA DUMP SERVICING |
OBIPRC_BJ_100_01 |
CREATE THIRD PARTY CUSTOMER FILE |
|
Yes |
|
|
This process pulls the customer account details shared in input data files for processing. |
ESC |
JOB TO GENERATE ESCROW DISCLOSURE STATEMENT |
OEDPRC_BJ_100_01 |
JOB TO GENERATE ESCROW DISCLOSURE STATEMENT |
|
Yes |
|
|
|
EDF |
ADR FILE |
EDFADR_BJ_100_01 |
ADR FILE |
|
Yes |
|
|
|
EDF |
IVR FILE |
EDFIVR_BJ_100_01 |
IVR FILE |
|
Yes |
|
|
|
TPE |
CONTRACTUAL PROMOTION CANCEL PROCESSING |
TXNPRM_BJ_100_04 |
CONTRACTUAL PROMOTION CANCEL PROCESSING |
|
Yes__ |
|
|
|
TPE |
RATE CHANGE PROCESSING FOR BACKDATED INDEXES |
TXNRAT_BJ_100_02 |
RATE CHANGE PROCESSING FOR BACKDATED INDEXES |
|
Yes |
|
|
|
RDB1 |
LOAD ACCOUNT RELATED DATA INTO T TABLES |
RACDMP_BJ_100_01 |
LOAD ACCOUNT RELATED DATA INTO T TABLES |
|
Yes |
|
|
|
TPE |
EXPIRED INSURANCE PROCESSING |
TXNINS_BJ_100_01 |
EXPIRED INSURANCE PROCESSING |
|
Yes |
|
|
|
ADT |
UPDATE ROWID IN AUDIT TABLE (RUN THIS JOB AFTER EXPORT-IMPORT OF TABLES) |
ADTPRC_BJ_100_01 |
UPDATE ROWID IN AUDIT TABLE (RUN THIS JOB AFTER EXPORT-IMPORT OF TABLES) |
|
Yes |
|
|
|
RDB1 |
LOAD INSURANCE DATA TO T-TABLES |
RINDMP_BJ_100_01 |
LOAD INSURANCE DATA TO T-TABLES |
|
Yes |
|
|
|
AGS |
SALE LEAD AGING |
AGSSAL_BJ_100_01 |
SALE LEAD AGING |
Yes |
|
|
|
|
BOD |
PROCESS PARKED TRANSACTIONS |
JOBBOD_BJ_000_02 |
PROCESS PARKED TRANSACTIONS |
|
Yes |
|
|
|
BOD |
MARK SYSTEM FOR BEGINING OF DAY |
JOBBOD_BJ_000_01 |
MARK SYSTEM FOR BEGINING OF DAY |
|
Yes |
|
|
|
EOD |
SET SYSTEM MODE TO END-OF-DAY |
JOBEOD_BJ_000_01 |
SET SYSTEM MODE TO END-OF-DAY |
|
Yes |
|
|
|
ACR |
DAILY TRIAL BALANCE DATA |
TABACC_BJ_100_01 |
DAILY TRIAL BALANCE DATA GENERATION |
|
Yes |
|
|
|
LTR2 |
RATE CHANGE PRE-INTIMATION LETTER |
LCSRAT_BJ_100_01 |
RATE CHANGE PRE-INTIMATION LETTER |
|
Yes |
|
|
|
BLK |
BULK UPLOAD FOR PRICING SETUP |
BLKPRP_BJ_100_01 |
BULK UPLOAD FOR PRICING SETUP |
Yes |
|
|
|
|
BLK |
BULK UPLOAD FOR GL ATTRIBUTES |
BLKGLS_BJ_100_01 |
BULK UPLOAD FOR GL ATTRIBUTES |
|
|
|
common |
|
BLK |
BULK UPLOAD FOR GL TRANSLATION |
BLKGLS_BJ_100_02 |
BULK UPLOAD FOR GL TRANSLATION DEFINITION |
|
|
|
common |
|
BLK |
BULK UPLOAD FOR GL TRANSACTION TYPES |
BLKGLS_BJ_100_03 |
BULK UPLOAD FOR GL TRANSACTION TYPES DETAILS |
|
|
|
common |
|
BLK |
BULK UPLOAD FOR GL TRANSACTION LINKS |
BLKGLS_BJ_100_04 |
BULK UPLOAD FOR GL TRANSACTION LINKS |
|
|
|
common |
|
ODD2 |
RATE CHANGE LETTER FILE |
OLSRAT_BJ_100_01 |
RATE CHANGE LETTER FILE CREATION |
|
Yes |
|
|
|
TPE |
EXPIRED DRAW PERIOD PROCESSING (STAGE FUNDED LOANS) |
TXNDRW_BJ_111_01 |
EXPIRED DRAW PERIOD PROCESSING (STAGE FUNDED LOANS) |
|
Yes |
|
|
|
ODD2 |
DEALER SUBVENTION STATEMENTS |
OPSSBV_BJ_100_01 |
DEALER SUBVENTION STATEMENTS GENERATION |
|
|
|
common |
|
TAM |
SUBVENTION RECEIVABLE PROCESSING (PAY AS GO) |
TPRSBV_BJ_100_01 |
SUBVENTION RECEIVABLE PROCESSING (PAY AS GO) |
|
|
|
common |
|
ODD2 |
PRODUCER CHECK PRINT |
OPCPRC_BJ_100_01 |
PRODUCER CHECK PRINT GENERATION |
|
|
|
common |
|
BSR |
BEHAVIORAL SCORING |
BSRPRC_BJ_100_01 |
BEHAVIORAL SCORING |
|
yes |
|
|
|
AGE |
TRANSACTION IN WAITING FOR APPROVAL AGING |
TXNAGE_BJ_100_01 |
TRANSACTION IN WAITING FOR APPROVAL AGING PROCESS |
|
yes |
|
|
|
ACR |
PREPARE BATCH DATA FOR INTEREST ACCRUAL AND DELINQUENCY |
TXNACR_BJ_100_02 |
PREPARE BATCH DATA FOR INTEREST ACCRUAL AND DELINQUENCY PROCESSING |
|
yes |
|
|
|
PDC |
POST DATED CHECKS |
PDCPRC_BJ_100_01 |
POST DATED CHECKS |
|
yes |
|
|
|
PDC |
PENDING PDC |
PDCPND_BJ_100_01 |
PENDING PDC PROCESSING |
|
yes |
|
|
|
LTR2 |
PDC RENEWAL LETTER |
LCSPDC_BJ_100_01 |
PDC RENEWAL LETTER GENERATION |
|
yes |
|
|
|
DOT |
APPLICATION DOCUMENT LOAD |
DOLPRC_BJ_000_02 |
APPLICATION DOCUMENT LOAD |
Yes |
|
|
|
|
ODD2 |
ONE TIME ACH POST DATED PAYMENT LETTER |
OLSPDP_BJ_100_01 |
ONE TIME ACH POST DATED PAYMENT LETTER PROCESSING |
|
Yes |
|
|
|
WFP |
BILLING |
WTXBIL_BJ_132_01 |
BILLING PROCESSING |
|
Yes |
|
|
|
WFP |
DELINQUENCY |
WTXDLQ_BJ_132_01 |
DELINQUENCY PROCESSING |
|
Yes |
|
|
|
WFP |
LATE CHARGE |
WTXLTC_BJ_132_01 |
LATE CHARGE ASSESSMENT |
|
Yes |
|
|
|
WFP |
STATEMENT |
WTXPSG_BJ_132_01 |
STATEMENT GENERATION |
|
Yes |
|
|
|
WFP |
RATE CHANGE |
WTXRAT_BJ_132_01 |
RATE CHANGE PROCESSING |
|
Yes |
|
|
|
WFP |
TERMINATION |
WTXTIP_BJ_132_01 |
TERMINATION PROCESSING |
|
Yes |
|
|
|
TPE |
PERIODIC MAINTAINENCE FEE |
TXNPMF_BJ_100_01 |
PERIODIC MAINTAINENCE FEE PROCESSING |
|
|
|
|
|
WFP |
UNIT UPLOAD |
WUPPRC_BJ_132_01 |
UNIT UPLOAD |
|
|
|
common |
|
ODD2 |
BATCH JOB FOR MONTHLY HANDSOFF FILE FOR SIMAH |
CBUUTL_BJ_100_04 |
BATCH JOB FOR MONTHLY HANDSOFF FILE FOR SIMAH |
|
|
|
|
|
PUR |
PURGE ALL PTT TABLES |
PTTPRC_BJ_100_01 |
PURGE ALL PTT TABLES |
|
|
|
comon |
|
TPE |
BATCH JOB FOR SETTING MATURED ACCOUNT CONDITION |
TXNMAC_BJ_100_01 |
BATCH JOB FOR SETTING MATURED ACCOUNT CONDITION |
|
yes |
|
|
|
TPE |
NON REFUND GL |
TXNRFD_BJ_100_01 |
NON REFUND GL PROCESSING |
|
|
|
common |
|
TPE |
PAYMENT ARRANGEMENT |
TXNPAP_BJ_100_01 |
PAYMENT ARRANGEMENT PROCESSING |
|
yes |
|
|
|
TPE |
DELAY FEE |
TXNDLY_BJ_100_01 |
DELAY FEE PROCESSING |
|
yes |
|
|
|
TPE |
STATEMENT PAST MATURITY |
TXNSTM_BJ_100_01 |
STATEMENT PAST MATURITY PROCESSING |
|
yes |
|
|
|
TPE |
BLACK BOOK INTERFACE |
VEVBBK_BJ_100_01 |
BLACK BOOK INTERFACE |
|
|
|
common |
|
LBT |
BULK NSF PAYMENT REVERSALS |
TXNNSF_BJ_100_01 |
BULK NSF PAYMENT REVERSALS |
|
|
|
|
|
ACR |
STOP INTEREST ACCRUAL |
TXNACR_BJ_100_03 |
STOP INTEREST ACCRUAL PROCESSING |
|
yes |
|
|
|
QRT |
CUSTOMER SERVICE REAL TIME QUEUE |
QCSPRC_BJ_100_02 |
CUSTOMER SERVICE REAL TIME QUEUE PROCESSING |
|
yes |
|
|
|
ODD2 |
OUTBOUND CUSTOMER EXTRACTS TO PAYMENT AGENCIES |
OCPPRC_BJ_100_01 |
OUTBOUND CUSTOMER EXTRACTS TO PAYMENT AGENCIES |
|
yes |
|
|
|
IFP |
OFFLINE CALL ACTIVITY POSTING |
ICAPRC_BJ_100_01 |
OFFLINE CALL ACTIVITY POSTING |
|
yes |
|
|
|
ACR |
RE-START INTEREST ACCRUAL |
TXNACR_BJ_100_04 |
RE-START INTEREST ACCRUAL |
|
yes |
|
|
|
IFP |
UPLOAD TRANSACTIONS |
ITUPRC_BJ_100_01 |
UPLOAD TRANSACTIONS |
|
yes |
|
|
|
IFP |
POST UPLOADED TRANSACTIONS |
ITUPRC_BJ_100_02 |
POST UPLOADED TRANSACTIONS |
|
yes |
|
|
|
IFP |
INPUT FILE PROCESSING - CURRENCY EXCHANGE RATE FILE UPLOAD |
ICEPRC_BJ_100_01 |
CURRENCY EXCHANGE RATE FILE UPLOAD |
Yes |
Yes |
Yes |
Common |
This process extracts currency exchange rates from desired source at scheduled intervals. |
IFP |
INPUT FILE PROCESSING - INPUT DATA INSERTION |
IDDPRC_BJ_000_01 |
INPUT DATA INSERTION |
|
Yes |
|
|
This process updates customer account information corresponding to the details received from external system. Ex: Bankruptcy details in External Interface screen or Cure Letter details in Account Information screen. |
IFP |
INPUT FILE PROCESSING |
IPIPRC_BJ_100_01 |
PI INFROMATION FILE UPLOAD PROCESSING |
Y |
Y |
Y |
Common |
This process uploads input file with PII data into the data masking screen. |
PUR |
ARCHIVE PURGE JOB SET |
PJRPAC_BJ_100_01 |
PURGE ACCOUNTS DATA |
Y |
Y |
Y |
Common |
This process purges accounts data in archival tables based on the days defined in system parameter PAC_PURGE_DAYS. |
PUR |
ARCHIVE PURGE JOB SET |
PJRPAP_BJ_100_01 |
PURGE APPLICATION DATA |
Y |
Y |
Y |
Common |
This process purges application data in archival tables based on the days defined in system parameter PAC_PURGE_DAYS. |
PUR |
ARCHIVE PURGE JOB SET |
PJRPGL_BJ_100_01 |
PURGE GL TXNS DATA |
Y |
Y |
Y |
Common |
This process purges general ledger transaction data in archival tables based on the days defined in system parameter PAC_PURGE_DAYS. |
PUR |
ARCHIVE PURGE JOB SET |
PJRPPA_BJ_100_01 |
PURGE POOLS DATA |
Y |
Y |
Y |
Common |
This process purges pools and its transactions data in archival tables based on the days defined in system parameter PAC_PURGE_DAYS. |
PUR |
ARCHIVE PURGE JOB SET |
PJRPPX_BJ_100_01 |
PURGE PRODUCER TXNS DATA |
Y |
Y |
Y |
Common |
This process purges producer transaction data in archival tables based on the days defined in system parameter PAC_PURGE_DAYS. |
PUR |
ARCHIVE PURGE JOB SET |
PJRPTX_BJ_100_01 |
PURGE TXNS DATA |
Y |
Y |
Y |
Common |
This process purges account transaction data in archival tables based on the days defined in system parameter PAC_PURGE_DAYS. |
PUR |
ARCHIVE PURGE JOB SET |
PJRPVA_BJ_100_01 |
PURGE VENDOR ASSIGNMENTS DATA |
Y |
Y |
Y |
Common |
This process purges vendor assignment data in archival tables based on the days defined in system parameter PAC_PURGE_DAYS. |
2.9 Collection Cycles
The Collection Cycles screen allows you to setup the collection workflow cycles.
To set up collection cycles
- Click Setup > Setup > Administration > System > Collection Cycles link. The system displays the Collection Cycles screen. The details are grouped into two:
- Status Cycle
- Current/Next Status
- Status Change Responsibilities
In the Collection Cycles section, you can view the following details:
Field |
Do this: |
Cycle |
The system displays the status cycle. |
Type |
The system displays the type of status cycle. |
- Perform any of the Basic Actions mentioned in Navigation chapter.
- In the Current/Next Status section, perform any of the Basic Operations mentioned in Navigation chapter.
A brief description of the fields is given below:
Field |
Do this: |
Current Code |
Select the current code from the drop-down list. |
Next Code |
Select the next code from the drop-down list. |
- Perform any of the Basic Actions mentioned in Navigation chapter.
- In the Status Change Responsibilities section, perform any of the Basic Operations mentioned in Navigation chapter.
A brief description of the fields is given below:
Field |
Do this: |
Responsibility |
Select the responsibility from the drop-down list. |
Allowed Ind |
Check this box to allow a record. |
Perform any of the Basic Actions mentioned in Navigation chapter.
2.10 Reports
The Reports screen allows you to setup reports in the system.
To set up the Reports
- Click Setup > Setup > Administration > System > Reports link. The system displays the Report screen. The details are grouped into two:
- Reports
- Report Parameters
- In the Reports section, perform any of the Basic Operations mentioned in Navigation chapter.
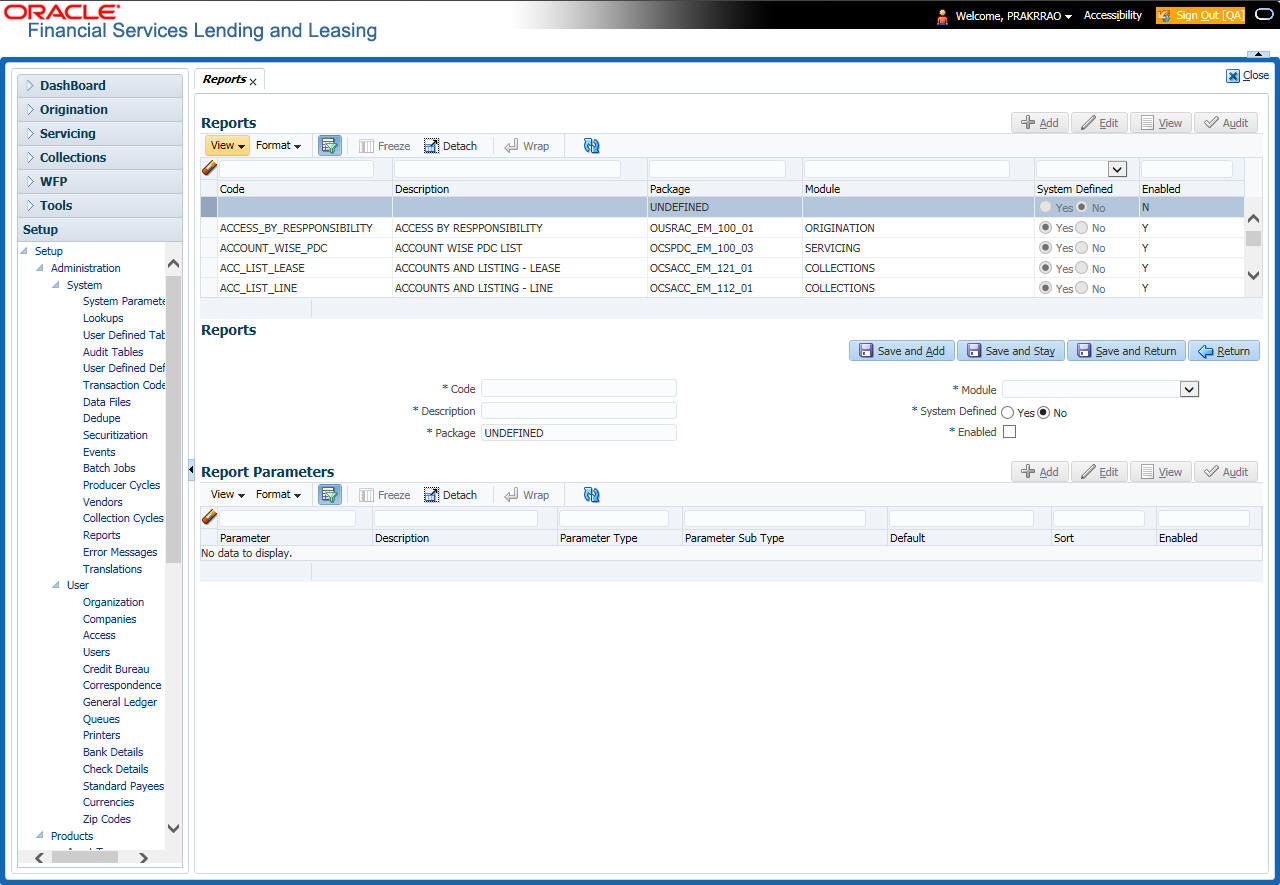
A brief description of the fields is given below:
Field |
Do this: |
Code |
Specify the code of the report. |
Description |
Specify the description of the report. |
Package |
Specify the package . |
Module |
Select the code of the report from the drop-down list. |
System Defined Yes/No |
Select ‘Yes’, if you wish to maintain the Report as system defined and ‘No’, if you do not want to maintain it as system defined. System defined entries cannot be modified. If the entry is not system defined, then it can be modified. |
Enabled |
Check this box to enable the report definition. |
- Perform any of the Basic Actions mentioned in Navigation chapter.
- In the Report Parameters section, perform any of the Basic Operations mentioned in Navigation chapter.
A brief description of the fields is given below:
Field |
Do this: |
Parameter |
Specify the parameter code of the report. |
Description |
Specify the description of the parameter. |
Parameter Type |
Select the parameter type of the report from the drop-down list. |
Parameter Sub Type |
Select the parameter sub type of the report from the drop-down list. |
Default |
Specify the default value for the report parameter (value to initially populate, or used if no value is supplied) (optional). |
Sort |
Specify the sort order for the lookup code. This determines the order these report parameters are displayed or processed. |
Enabled |
Check this box to enable the report definition. |
- Perform any of the Basic Actions mentioned in Navigation chapter.
2.11 Error Messages
In the Error Messages Setup screen, you can translate or modify the text of error messages. the system displays all messages as they appear to the system users in the Error Message section’s Message field.
New messages created with the Error Messages screen can then be translated with the Setup > Setup > Administration > System > Translation > Message Translation screen.
To set up the Error Messages Setup screen
- Click Setup > Setup > Administration > System > Error Messages. The system displays the Error Message screen.
- On the Error Messages Setup screen’s Error Type section, use the Error Type field to select the error type. These are the categories of error messages available for creating or editing.
- The error messages associated with the error type you selected appear in the Error Message section.
- In the Error Messages section, perform any of the Basic Operations mentioned in Navigation chapter.
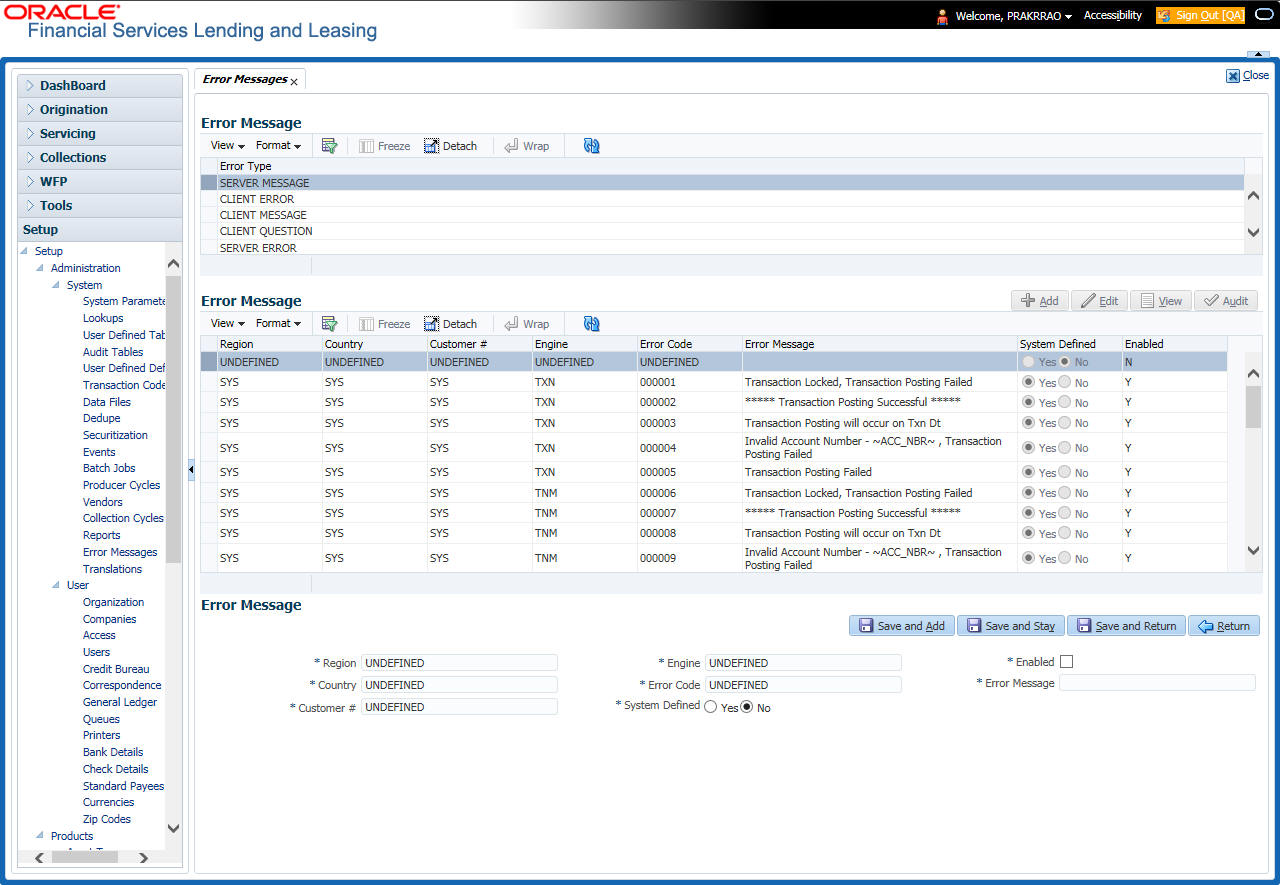
A brief description of the fields is given below:
Field |
Do this: |
Region |
Specify the region code. |
Country |
Specify the country code. |
Customer |
Specify the customer code. |
Engine |
Specify the engine code. |
Error Code |
Specify the error code. |
System Defined |
Displays whether the record is system defined or not. |
Enabled |
Check this box to enable the data error message. |
Error Message |
Specify the error message. |
- Perform any of the Basic Actions mentioned in Navigation chapter.
2.12 Translation
You can setup translation properties.
Navigating to Translation
- Click Setup > Setup > Administration > System > Translation. The system displays the Translation screen. On this screen you can,
- Setup Translation
- Translate Error Messages
2.12.1 Setup Translation
In the Setup Translation tab, you can translate the contents of a predefined list of setup description fields into a different language.
After you translate an entry in the Translation Data section, the system adds the new data to the setup form.
To set up the Translation Setup
- Click Setup > Setup > Administration > System > Translation > Setup Translation.
- In the Language section, you can select the language for which you need to setup the translation.
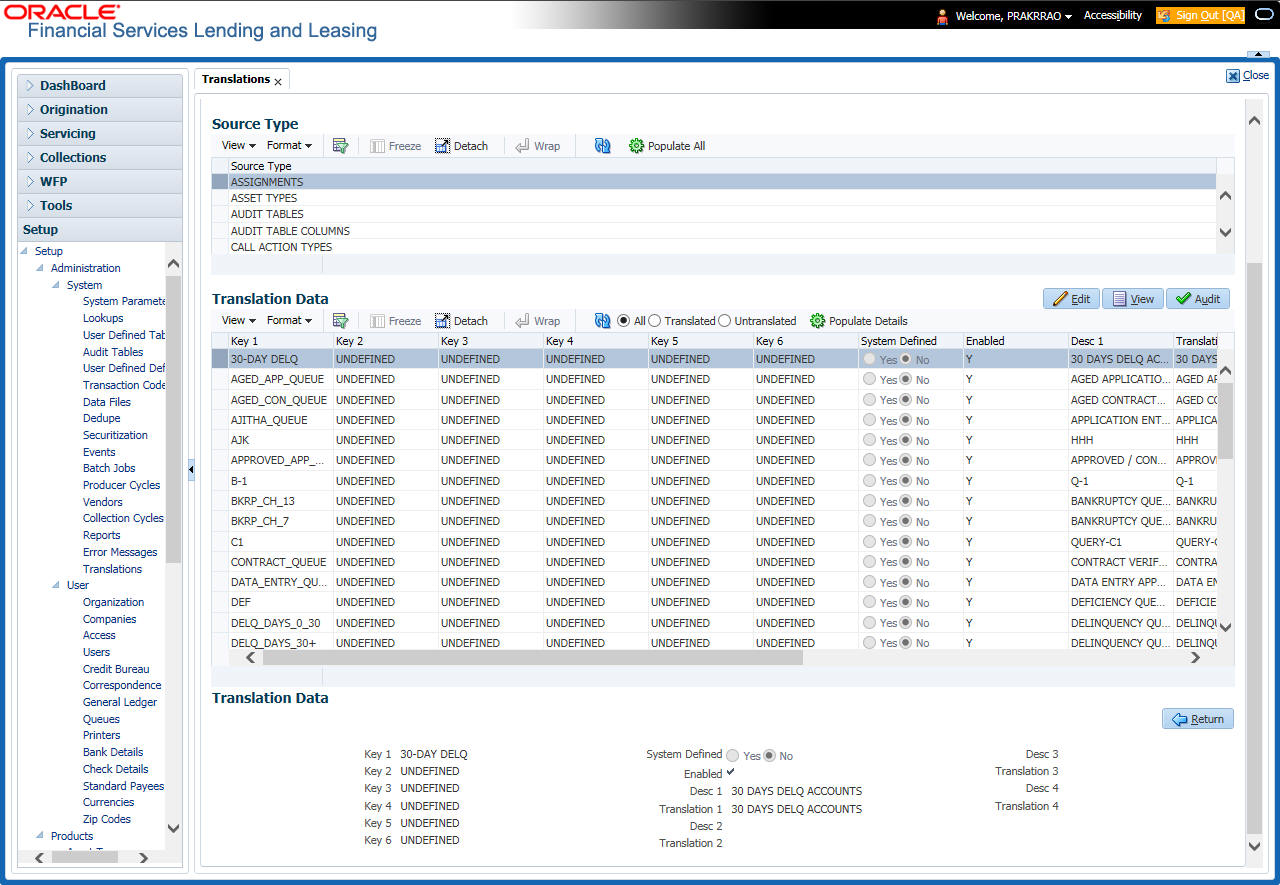
Note
For more information, refer Language setup at the end of this chapter.
- In the Source Type section, you can select the source (or location in the system) of the item you want to translate.
- Click Populate All in the Source Type section and the system loads the setup data descriptions in the Translation section screen for the selected source type.
If you have new entries and are unsure as to which setup items have been updated since the last translation, click Populate All, the system loads the additional data for all items with no impact to the previously translated data for any of the entries.
- In the Translation Data section, Select:
- All – to view all the records (both translated and un-translated) in the Translation Data section.
- Translated – to view all the translated records in the Translation Data section.
- Un Translated – to view all the un-translated records in the Translation Data section.
- In the Translation Data section, perform any of the Basic Operations mentioned in Navigation chapter.
Note
You cannot add a new record.
A brief description of the fields is given below:
Field |
Do this: |
Key 1 |
Displays the first reference key value. |
Key 2 |
Displays the second reference key value. |
Key 3 |
Displays the third reference key value. |
Key 4 |
Displays the fourth reference key value. |
Key 5 |
Displays the fifth reference key value. |
Key 6 |
Displays the sixth reference key value. |
System Defined |
Select ‘Yes’, if you wish to maintain the data as system defined and ‘No’, if you do not want to maintain it as system defined. |
Enabled |
Check this box to indicate that the record is active. |
Desc 1 Translation 1 |
Specify the first translated description. |
Desc 2 Translation 2 |
Specify the second translated description. |
Desc 3 Translation 3 |
Specify the third translated description. |
Desc 4 Translation 4 |
Specify the fourth translated description. |
- Perform any of the Basic Actions mentioned in Navigation chapter.
2.12.2 Message Translation Setup
In the Message Translation tab, you can translate the contents of a predefined list of error messages into a different language.
After you translate an entry in the Error Message section, the system adds the new data to the error message.
To set up the Message Translation Setup
- Click Setup > Setup > Administration > System > Translation > Message Translation.
- In the Language section, you can select the language for which the translation needs to be done.
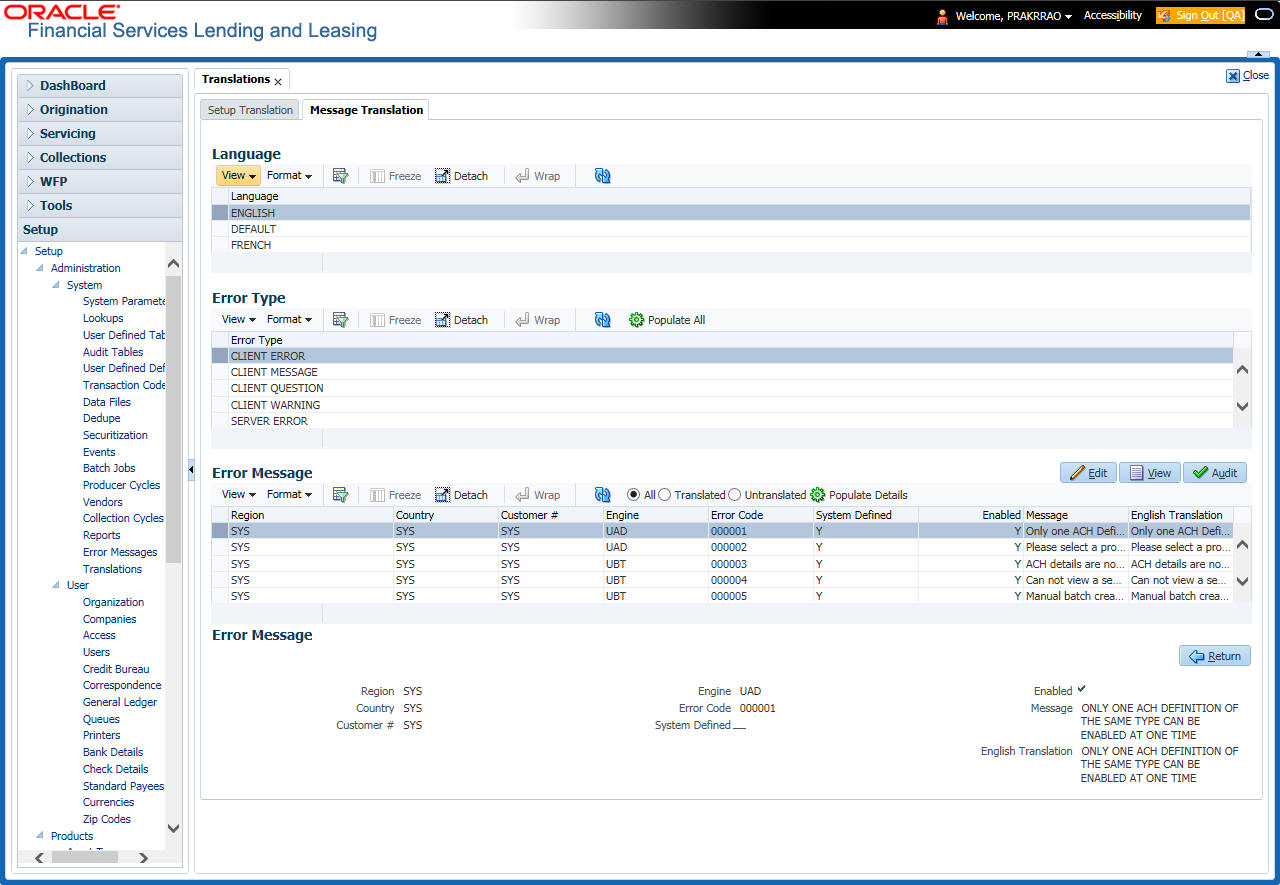
Note
For more information, refer Language setup at the end of this chapter.
- In the Error Type, you can select the type of error message you want to translate.
- Click Populate All in the Error Type section and the system loads the error messages in the Error Message section for the selected error type.
If you have new entries and are unsure as to which error messages have been updated since the last translation, click Populate All, the system loads the additional data for all items with no impact to the previously translated data for any of the entries.
- In the Error Message section, select:
- All – to view all the records (both translated and un-translated) in the Error Message section.
- Translated – to view all the translated records in the Error Message section.
- Untranslated – to view all the un-translated records in the Error Message section.
- In the Error Message section, perform any of the Basic Operations mentioned in Navigation chapter.
Note
You cannot add a new record.
A brief description of the fields is given below:
Field |
Do this: |
Region |
Displays the region code. |
Country |
Displays the country code. |
Customer |
Displays the customer code. |
Engine |
Displays the engine name. |
Error Code |
Displays the error code. |
System Defined |
Check this box to indicate that the record is system defined. |
Enabled |
Check this box to indicate that the record is active. |
Message |
Specify the error message. |
English Translation |
Specify the English translated description. |
- Perform any of the Basic Actions mentioned in Navigation chapter.
Language setup
On the Lookup master tab’s Lookup Types screen, you can add other languages to the TRD_LANGUAGE_CD lookup type and perform translations for those languages.
However, translated data only appears in one language, which is defined by the User Language parameter. This parameter can be defined in the system configuration file, typically named DBKWEB.CFG, which defines the parameter as:
Parameter: otherparams=ORA_USER=<schema_name> USR_LANG=<native language>
Note
<native language> should match lookup codes in the TRD_LANGUAGE_CD lookup type on the Administration form’s Lookups screen.
The system supports the following pre-defined list of setup items for translation:
- Asset Sub Types
- Asset Types
- Assignments
- Audit Table Columns
- Audit Tables
- Call Action Result Types
- Call Action Types
- Checklist Action Types
- Checklist Types
- Commission Plans
- Companies
- Company Branch Departments
- Company Branches
- Compensation Plans
- Credit Bureau Score Reasons
- Credit Models
- Credit Scoring Parameters
- Edits
- Escrow Disburse Rules
- Escrow Sub Types
- Flex Table Attributes
- Flex Tables
- GL Transaction Types
- GL Translators
- Job Sets
- Jobs
- Lookup Codes
- Lookup Types
- Portfolio Companies
- Portfolio Company Branches
- Producers
- Product Instruments
- Product Insurances
- Product Pricings
- Products
- Promotions
- Spreads
- Standard Correspondences
- Standard Document Definitions
- Standard Element Definitions
- Standard Function Definitions
- Transaction Codes
- Error Messages
- Org. Fees
2.13 Seed Data
Seed data in general is referred to as any data delivered with the standard product installation and is required to be present in the production environment for application to work properly. Seed data basically consists of Table with its associated data that are uploaded into the system through DAT files.
Seed Data screen in Oracle Financial Services Lending and Leasing displays the seed data details maintained in the system along with the updated seed data provided with the latest release or patch installation.
Note that, when you upgrade OFSLL from an existing version to higher version,
- New seed data provided as part of that release is automatically updated into the system.
- Seed data which are modified from previous release to current release needs to be manually accepted and updated into the system.
The modified seed data can have updates on base tables and/or its associated data and the changes can either be updated or skipped depending on the need.
Navigating to Seed Data screen
- Click Setup > Setup > Administration > System > Seed Data. The system displays the Seed Data screen.
- On this screen you can do the following:
- View the factory shipped seed data and update/skip the seed data differences between existing and updated seed data in ‘Factory Data’ tab.
- View the customized (i.e. changed or configured) seed data as part of implementation in ‘Current Data’ tab.
- View the differences between Factory data and Current data in ‘Comparison Data’ tab.
- Download all or only the required table specific seed data in “Download Data’ tab.
2.13.1 Factory Data
The Factory Data tab displays the list of both existing and updated seed data which are provided though release/patch installation. In the Factory Data tab you can select and update only the required seed data changes into the respective seed data tables. During update, you can also skip the seed data changes for later updates (if required).
Accordingly, you can sort the view in Factory Data tab by selecting ‘Skipped’, ‘Update’ or ‘All’ options to display the list of corresponding seed data.
In the ‘Patch #’ drop-down list, you can further sort the list to display ‘ALL’ the seed data or only the additions or updates available as part of latest patch which has seed data changes.
To View Factory Data
Click Setup > Setup > Administration > System > Seed Data > Factory Data tab.
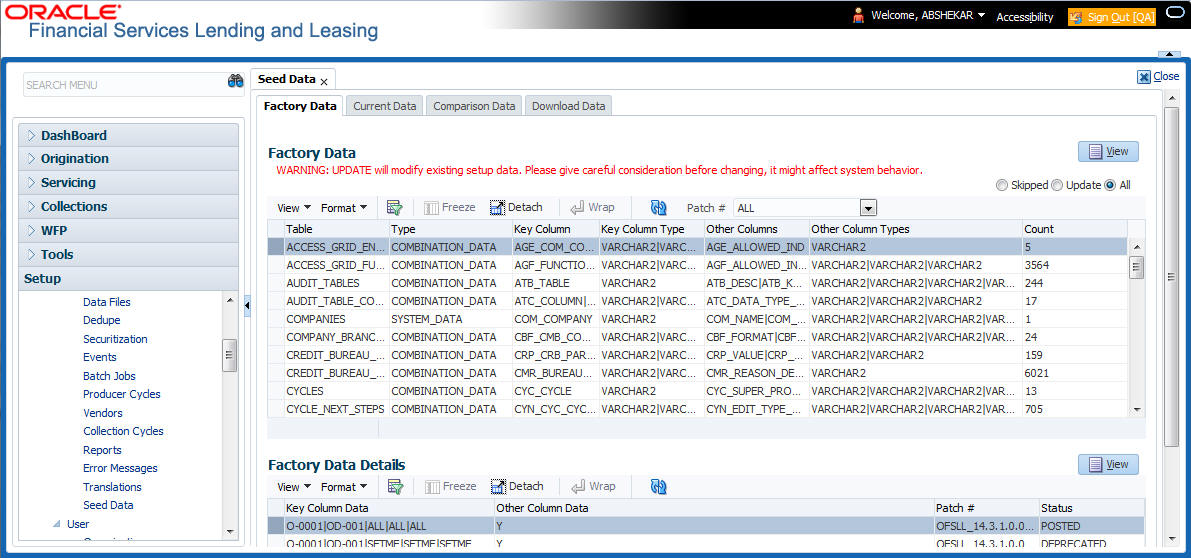
The ‘Factory Data’ section displays the list of seed data with the following details:
Field |
View this: |
Table |
Displays the seed data table name. |
Type |
Displays the category of seed data as either System or Combination Data. |
Key Column |
Displays the unique identifier columns. |
Key Column Type |
Displays the unique identifier column data types. |
Other Columns |
Displays the non unique identifier column names. |
Other Column Types |
Displays the non unique identifier column data types. |
Count |
Displays the total count of updated records in the seed data table. |
The ‘Factory Data Details’ section displays the associated data of the selected seed data table along with the following details:
Field |
View this: |
Key Column Data |
Displays the unique identifier column names. |
Other Column Data |
Displays the non unique identifier column names. |
Patch # |
Displays the patch number with which the seed data changes are identified. |
Status |
Displays the current status of seed data as one of the following: INSERT: This status indicates new seed data. UPDATE: This status indicates if there are changes in the record when compared to the seed data released in previous patch. POSTED: This status indicates that the seed data changes are updated into the main tables and is subsequently updated from previous status - SKIPPED OR UPDATE OR INSERT. SKIPPED: This status indicates that the seed data is not updated into the main tables. DEPRECATED - This status indicates that the seed data is no longer used. |
In the ‘Factory Data’ tab, you can click  (refresh) to fetch the latest details and click ‘View’ to display the detailed information of the selected record.
2.13.1.1 Update/Skip Seed Data
The ‘Update’ option in the Factory Data tab allows you to replace the existing seed data with the current update. However, ensure to double check the details before performing ‘Update’ operation since the same can have significant impact on system behaviour.
To Update/Skip Data
- In the Factory Data’ tab, select ‘Update’. System displays those records which can be updated to the existing seed data tables.
- Inspect the required record in Factory Data section with the Factory Data Details in subsequent section.
- Select the required record to be updated by clicking on the adjacent check box. You can also click ‘Select All’ to select all the records.
- Do one of the following:
- Click ‘Update Data’. This action updates the existing seed data with the updated seed data provided as part of the current patch release.
- Click ‘Skip Data’. This action skips the seed data changes received as a part of the patch release. The skipped records can be viewed by selecting ‘Skipped’ option in Factory Data tab. However, the same can further be updated into the system, by selecting ‘Update Data’.
- Click ‘Yes’ in confirmation dialog to confirm the setup data changes.
On successful update, system does the following:
- When individual records are selected and updated, the same is removed from Factory Data Details section and the ‘Count’ column in Factory Data section is updated with the remaining number of records.
- In case of Bulk update, the record is removed from Factory Data tab.
2.13.2 Current Data
The Current data tab displays the customized seed data which are changed or configured as part of implementation. In the ‘Current Data’ tab, you can click (refresh) to fetch the latest details and click ‘View’ to display the detailed information of the selected record.
Additionally you can click “Refresh Data’ to pull the seed data details from the production system and update the current seed data tables.
To View Current Data
Click Setup > Setup > Administration > System > Seed Data > Current Data tab.
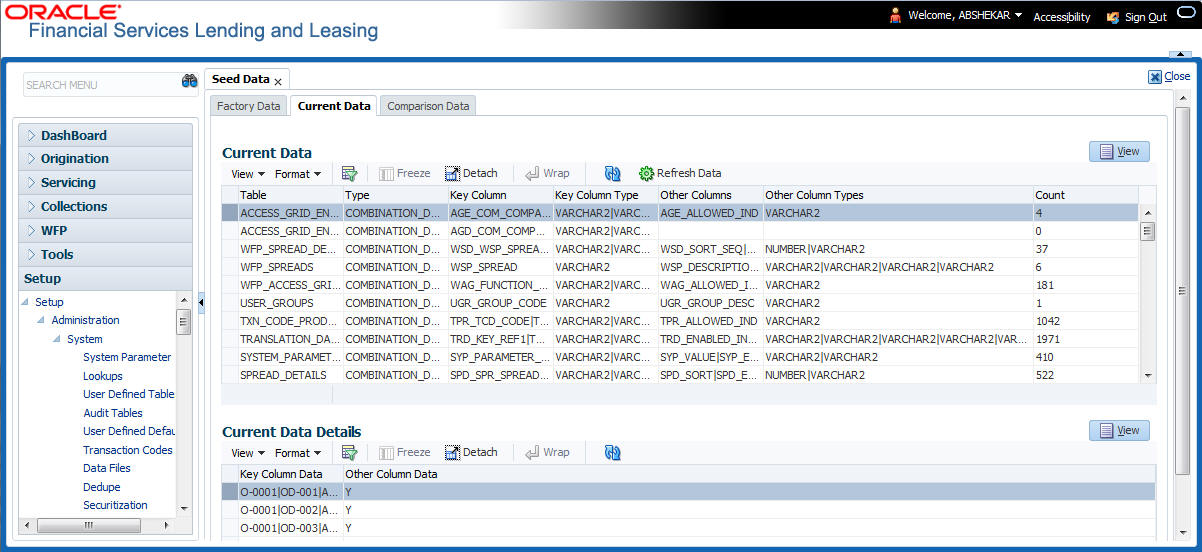
The ‘Current Data’ section displays the following details:
Field |
View this: |
Table |
Displays the current seed data table name. |
Type |
Displays the category of seed data as either System or Combination Data. |
Key Column |
Displays the unique identifier columns. |
Key Column Type |
Displays the unique identifier column data types. |
Other Columns |
Displays the non unique identifier column names. |
Other Column Types |
Displays the non unique identifier column data types. |
Count |
Displays the total count of records in the seed data table. |
Last Refreshed Dt |
Displays the date and time when seed data for the selected table was last updated in the system. |
The subsequent ‘Current Data Details’ section displays the associated data of the selected seed data table along with the following details:
Field |
View this: |
Key Column Data |
Displays the unique identifier column names. |
Other Column Data |
Displays the non unique identifier column names. |
2.13.3 Comparison Data
The ‘Comparison Data’ tab displays the differences between factory shipped seed data and current customized seed data.
To View Comparison Data
Click Setup > Setup > Administration > System > Seed Data > Comparison Data tab.
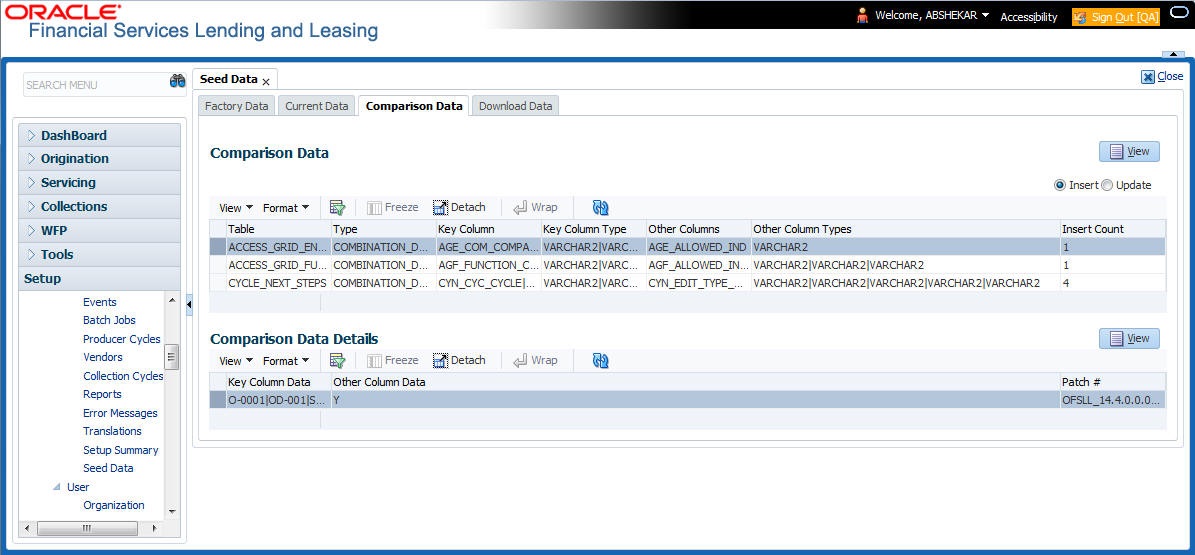
The ‘Comparison Data’ section displays the list of seed data records with the following details:
Field |
View this: |
Table |
Displays the seed data table name to be inserted or updated. |
Type |
Displays the category of seed data as either System or Combination Data. |
Key Column |
Displays the unique identifier columns. |
Key Column Type |
Displays the unique identifier column data types. |
Other Columns |
Displays the non unique identifier column names. |
Other Column Types |
Displays the non unique identifier column data types. |
Count |
Displays the total count of records in the seed data table. |
The subsequent ‘Comparison Data Details’ section displays the associated data of the selected seed data table along with the following details:
Field |
View this: |
Key Column Data |
Displays the unique identifier column names. |
Other Column Data |
Displays the non unique identifier column names. |
Patch # |
Displays the patch release version with which the seed data was inserted/updated. |
In the ‘Comparison Data’ tab, you can click (refresh) to fetch the latest details and click ‘View’ to display the detailed information of the selected record.
2.13.4 Download Data
The Download Data tab allows you to download table specific seed data available in the system in ‘.dat’ format. While migrating from one environment to other, you can use the Download Data tab to download the existing seed data and perform a bulk upload of all/required files.
Similar to other file download process, based on the value defined for the system parameter ‘CMN_FILE_PROCESS_TO_LOB’, the seed data download file can be accessed from the Process Files interface (if value is ‘Y’) or Database Files system (if value is ‘N’). For more information on handling Incoming/Outgoing process files, refer to ‘Dashboard’ section in User Guides.
To Download Data
- Click Setup > Setup > Administration > System > Seed Data > Download Data tab.
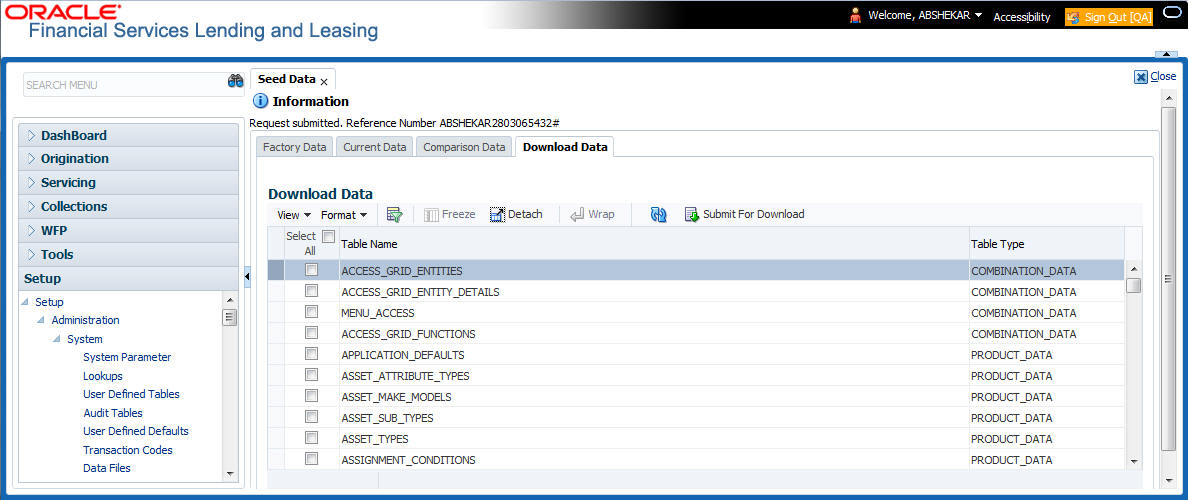
The Download Data section displays the list of tables maintained in the system with ‘Table Name’ and ‘Table Type’. Click (refresh) to fetch the latest details.
- Select the check box adjacent to the required table in the list. You can choose ‘Select All’ check box to select all the tables with seed data maintained in the system.
- Click ‘Submit For Download’ button. System displays an information message in the header indicating that the request has been submitted along with a reference number. The reference number is generated in format - useridDDMMHHMISS# followed by table name with ‘.dat’ extension. For example, (USER1230603121517#lookups.dat)
(Optional) If ‘CMN_FILE_PROCESS_TO_LOB’ is set to ‘Y’, navigate to DashBoard > Process Files screen > Outgoing Process File tab to download the selected seed data file which will be listed with the same reference number. The file can be downloaded to Application server.
2.14 Data Masking
Data masking screen in Oracle Financial Services Lending and Leasing facilitates to mask Personally Identifiable Information (PII) displayed in the application to safeguard the sensitive and confidential information while protecting them from offenders.
As part of the product installation, standard set of identified fields (seed data) which is likely to contain either organization / customer PI information are provided for data masking in disabled status. Based on need, the required fields can be enabled and masked for specific user responsibility in the Data Masking screen. Also if there are additional PII fields identified for masking, the same can be pooled into the system using input file processing method and masked using Data Masking screen.
The data masking process involves the following steps:
- Identify and enable field(s) (seed data) to be masked
- Select user responsibility for whom the data has to be masked
- Execute batch job to create data redaction policy
- Compile the data redaction policy
- (Optional) Process user identified PII data for masking
The following table indicates the standard pre-defined fields (seed data) identified in respective screens/tabs which can be readily masked using the Data Masking screen.
Tab Name |
Field Names |
Origination |
|
Applicant |
First Name, MI, Last Name, Family Name, Birth Dt, Nationality, National ID, Visa #, Passport #, License #, Marital status, Mother's maiden name, Passport number, Gender, Language, Dependents, Ethnicity, Disability, Email, Race, and Education. |
Applicant > FATCA |
Birth Place, Birth Country, and Permanent US Resident Status. |
Applicant > Power of Attorney |
Holder Name, Address, Country, Nationality, and Telephone Number. |
Applicant |
Active Military Duty, Military Effective Date, Duty Order Number, and Active Military duty Release date. |
Addresses |
Country, Postal Address Type, Address #, Street Pre, Street Name, Street Type, Street Post, Apt #, Address 1, Address 2, Address 3, Zip, Zip Extn, City, State, and Phone. |
Telecoms |
Phone and Extn |
Employments |
Employer, Country, Address #, Address 1, Address 2, Zip, Zip Extn, City, State, Phone, Extn, Income Amt - Stated, Income Amt - Actual, Salary - Stated, Salary - Actual, and Title. |
Applicant > Financials |
Type, Source, Account #, and Currency. |
Existing Accounts |
Account # and Title. |
Servicing |
|
Customer |
Name, Birth Dt, Nationality, National ID, Visa #, Passport #, License #, Marital status, Mother's maiden name, Passport #, Language, Disability, Email, and Education. |
Customer > FATCA |
Birth Place, Birth Country, and Permanent US Resident Status. |
Customer > Power of Attorney |
Holder Name, Address, Country, Nationality, and Telephone Number. |
Customer |
Active Military Duty, Military Effective Date, Duty Order Number, and Active Military duty Release date. |
Addresses |
Country, Postal Address Type, Address #, Street Pre, Street Name, Street Type, Street Post, Apt #, Address 1, Address 2, Address 3, Zip, Zip Extn, City, State, Phone, and Address. |
Employments |
Employer, Country, Address #, Address 1, Address 2, Zip, Zip Extn, City, State, Phone, Extn, and Title. |
Assets tab |
|
Assets |
Identification #, Lien Status, Lien Event Date, Second Lien Holder, Comments, Lien Release Entity, and Entity Name. |
Masking Format
Oracle Financial Services Lending and Leasing supports only complete masking (not partial) of both factory shipped and user identified PII data. On masking, the masked data is presented in same structural format to facilitate internal validations. The below table indicates the default values used for masking fields based on data type:
Data Type |
Masking Value |
NUMBER |
9 |
VARCHAR |
X |
DATE |
31/12/9999 |
Phone number |
For UI represented format - 000-000-0009 (Masked with 0’s and last digit as 9) and for generic, masked as 9999999999 |
xxxxx.xxx@<domain>.com |
Note
It is recommended to avoid modifying masked data for user(s) with masked responsibility. However, while editing masked data (if permitted) requires to input full data replacing the masked characters. For example, editing a masked SSN (xxx.xx.xxxx) requires to specify all nine digits of SSN and not just the last four digits.
2.14.1 Setup Data Masking
- Click Setup > Administration > System > Data Masking.
- Define the parameters available in ‘Data Masking Details’ and ‘User Access Details’ tabs.
2.14.1.1 Data Masking Details
On clicking Data Masking link, the Data Masking Details tab is displayed by default and allows you to enable the required fields for masking.
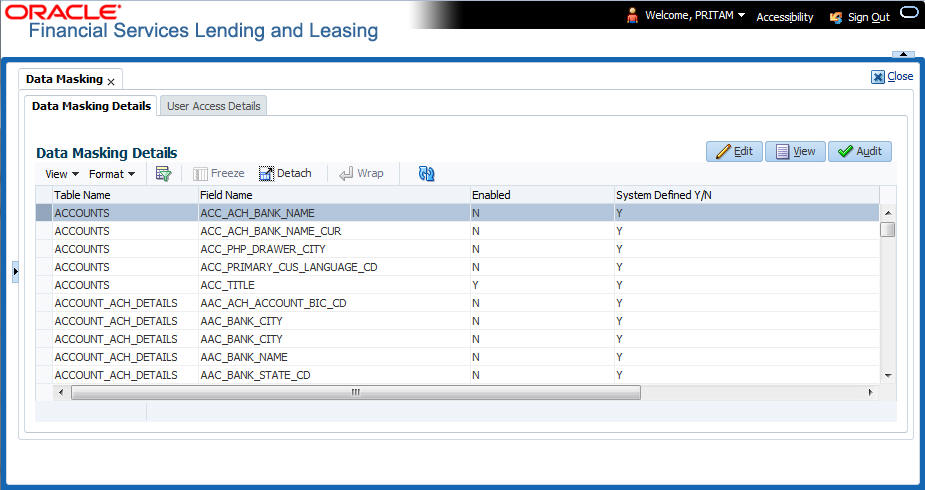
- In the Data Masking Details section, perform any of the Basic Operations mentioned in Navigation chapter.
A brief description of the fields are given below:
Field |
Do this: |
Table Name |
View the table name which contains the selected field details. |
Field Name |
View the selected field name. |
Enabled |
Check this box to enable masking of the selected field. |
System Defined |
View the type of seed data maintained in the system. ‘Y’ indicates factory shipped seed data and ‘N’ indicates user defined seed data. |
- Perform any of the Basic Actions mentioned in Navigation chapter.
2.14.1.2 User Access Details
The User Access Details tab facilitates to define the user responsibility to whom the PII data should be masked. By default, all the selected PII data in Data Masking Details tab appears as masked for one or more user(s) selected in this tab.
- Click Setup > Administration > System > Data Masking > User Access Details.

- In the User Access Details section, perform any of the Basic Operations mentioned in Navigation chapter.
A brief description of the fields are given below:
Field |
Do this: |
Responsibility |
Select the user responsibility from the drop-down list. |
Masked |
Check this box to enable masking for the selected user. Note: Defining a user and not selecting the masked check box will only create the record and masking rules are not applied. |
- Perform any of the Basic Actions mentioned in Navigation chapter.
2.14.2 Create data redaction policy
Once the data masking details are defined and stored in the database, you need to create a data redaction policy which facilitates for field level masking while displaying the details to the respective user. A data redaction policy file contains the policies on the columns enabled in the Data Masking Details screen.
To create data redaction policy
Click Setup > Administration > System > Batch Jobs and execute the following batch job (in single thread mode only):
Set Code |
Description |
Job Code |
SET-RED |
POLICY CREATION FOR PERSONAL IDENTIFIABLE INFORMATION DATA |
REDPRC_BJ_100_01 |
This batch job can either be scheduled for regular run or executed on-demand and facilitates to generate data redaction policy picking only the enabled data masking field information from database. On every run, the batch job drops and re-creates new set of policies in the file based on the details updated in Data Masking Details screen.
The generated policy is either written into CLOB or sql file depending on the following option:
- if the value of system parameter ‘CMN_FILE_PROCESS_TO_LOB’ is set to ‘Y’, the policy file is generated in CLOB and can be accessed by navigating to DashBoard > Process Files screen. For more information on handling Incoming/Outgoing process files, refer to ‘Dashboard’ section in User Guides.
- If the value of system parameter ‘CMN_FILE_PROCESS_TO_LOB’ is ‘N’, the policy is generated as an sql file and stored in the repository path as defined in the system parameter - CMN_SERVER_HOME. For example, /scratch/OFSLL/<release>/sql.
Further, the policy file needs to be manually compiled into database schema to apply the masking rules for respective fields for that particular user. Either a system administrator or any other user having administration privileges needs to compile the policies in the database.
Note
For every change in the data masking details such as masking additional fields or unmasking / disabling masked fields, a new policy is to be created by executing the batch job.
2.14.3 Masking User defined data
Apart from factory shipped seed data, additional user identified PII data can be masked by uploading an input file with field details and processing it in Data Masking screen using input file processing method.
- On identifying the fields, create an input file (in text file format) with table name, column name, and enabled indicator (Y/N) for each field level record. If enabled indicator is ‘N’, the record is not processed for data masking.
For example, BUSINESS_APPL_DETAILS,BSD_LEGAL_NAME,N
- Place the input file to repository path as defined in system parameter CMN_SERVER_PATH. For example, /scratch/OFSLL/<release>/input/ipi
- Navigate to Setup > Administration > System > Batch Jobs screen and execute the following batch job:
Set Code
Description
Job Code
SET-IFP
PI INFROMATION FILE UPLOAD PROCESSING
IPIPRC_BJ_100_01
On execution, the batch job picks the file from the location, processes it and loads the seed data into Data Masking screen. By default, all the user identified PII data from input file is categorized separately in Data Masking screen by assigning the value of ‘System Defined’ property as ‘N’.
Once the data is available in Data Masking screen, enable the required fields, assign user responsibility and run the processing batch job - redprc_bj_100_01 to generate a redaction policy. For more details, refer Create data redaction policy section.